
Everything posted by Miguel Angel Doncel
-
 We already anwered via support, but we are posting the answer here so other users can also see the info as it can be useful for them: At the moment Workflows has 3 nodes supporting DNx - DNxHD (OP1A for 36, 120, 185 and 185x) - DNxHD OpAtom (OpAtom LB, SQ, HQ, and HQX) - DNxHR (OP1A LB, SQ, HQ, HQX, and 444) At the moment, we do not support DNxHR Op Atom. we plan to do it at some point, but we do not have date for that development just jet If you need any further information, feel free to let us know.
 -
Hi curly, sorry but at the moment there is no integration with Wf and render farms. That is something we are considering to add. but we have no roadmap for that, and it will definitively not happen before V10.5 cheers
-
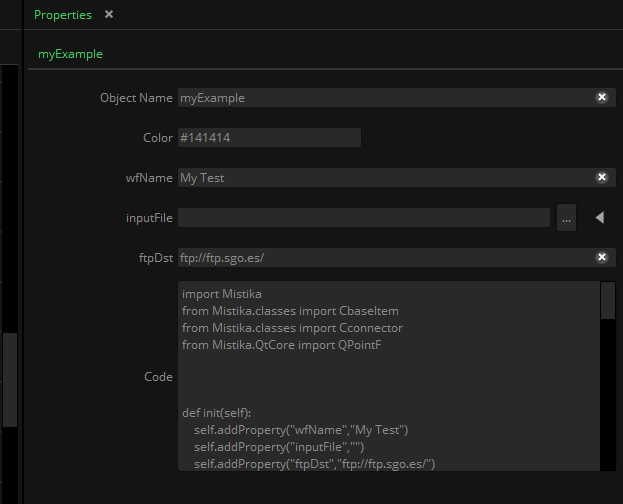
This example is the same as but this time, we will create the workflow during the execution of another workflow with a python node. Please Note you will need Wf Version 10.4.1 or later to execute this code The behaviour will be very silimar to the previous example, but in this case, 3 properties are added to the node to parametrize them; wfName: to store the name to use when creating the new workflows inputFile: to set the input file path ftpDst: to set the final ftp destination the node will also check that the inputFile exists before allowing you to execute the workflow So, with those changes, the python node would look like this: import Mistika from Mistika.classes import CbaseItem from Mistika.classes import Cconnector from Mistika.QtCore import QPointF def init(self): self.addProperty("wfName","My Test") self.addProperty("inputFile","G:/MATERIAL/formatos/EXR/CU_BIC_FX008_BICHA_V3_0035.exr") self.addProperty("ftpDst","ftp://ftp.sgo.es/") return True def isReady(self): if len(self.inputFile)==0: #no empty file supported return self.critical("myTest:isReady:len","input file can not be empty") return True def process(self): #create the example workflow wf=Mistika.workflows.addWorkflow(self.wfName) # creates a workflow file=wf.importFile(self.inputFile,True) #automatically create a node from a file (the node created depends on the file type (It is similar to droping a file into the workflow editor. The second parameter says if the file comes from a sequence print file file.pos=QPointF(0,0) prores=wf.addNode("ProRes",CbaseItem.NODETYPE_TASK) # add a prores file (From the Tasks group. this helps to diferenciate nodes that appear in more than one group (such us FTP) print prores prores.pos=QPointF(300,0) # reposition the prores node (just for clarity) ftp=wf.addNode("FTP",CbaseItem.NODETYPE_OUTPUT) # add an ftp output node print ftp ftp.pos=QPointF(600,0) # reposition the prores node (just for clarity) file.getFirstConnectorByName("VideoOut").link(prores.getFirstConnectorByName("VideoIn")) # connect the nodes prores.getFirstConnectorByName("VideoOut").link(ftp.getFirstConnectorByName("File")) # connect the nodes #populate node properties file.gamma="Linear" # define source color space file.gamut="ACES (AP1)" prores.colorSpace="Rec2020" # define destination Color Space prores.resolution="HD 1080 (1920x1080)" # define destination resolution prores.displayFilter="watermark" # set a display filter called watermark ftp.url=self.ftpDst # set the destination ftp address wf.giveBackAffinity() # this function will be needed in versions >= 10.4.0 to give the management of the created workflow back to the system return True To create the node with the code above you can paste the node in the script editor, and using Right Mouse Button->Save In ibrary, and call it "myExample". that will create a myExample.py in the SGOAppData/shared/workflowsLibrary directory and a myexample.xsd in the SGOAppData/shared/config/schemas directory. the myexample.xsd needs to be edited in order to add the properties defined in the python script. here you have an example of a myexample.xsd file with the properties added <xsd:schema xmlns:sgo="http://www.sgo.es/2017/sgo.xsd" xmlns:xsd="http://www.w3.org/2001/XMLSchema"> <xsd:element sgo:categoryType="categoryCollapsible" name="myExample" sgo:visibility="0" sgo:sortOrder="0"> <xsd:complexType> <xsd:sequence> <xsd:element name="objectName" type="xsd:string" sgo:visibility="0" sgo:sortOrder="0"/> <xsd:element name="color" type="color" sgo:visibility="0" sgo:sortOrder="1"/> <xsd:element name="wfName" type="xsd:string" sgo:visibility="0" sgo:sortOrder="10"/> <xsd:element name="inputFile" type="universalPath" sgo:properties="readOnly|urlVisibleButtonBrowser|pathNameFilters('All Files (*.*)')|fileDialogWindowTitle('Select a File')" sgo:visibility="0" sgo:sortOrder="11"/> <xsd:element name="ftpDst" type="xsd:string" sgo:visibility="0" sgo:sortOrder="12"/> <xsd:element name="code" type="textEditor" sgo:visibility="0" sgo:sortOrder="51"/> </xsd:sequence> </xsd:complexType> </xsd:element> </xsd:schema> As soon as you write this xsd file in the schemas folder you will see the new properties appearing in the properties editor, like this:
-
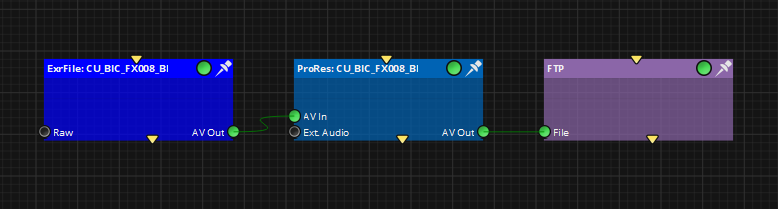
Hi all, Here you have a small example to illustrate how to create workflows using Py scripting In this example, the created workflow will look like this: Code: # imports used in the example import Mistika from Mistika.classes import CbaseItem from Mistika.classes import Cconnector from Mistika.QtCore import QPointF #create the example workflow wf=Mistika.workflows.addWorkflow("My Test") # creates a workflow file=wf.importFile("G:/MATERIAL/formatos/EXR/CU_BIC_FX008_BICHA_V3_0035.exr",True) #automatically create a node from a file (the node created depends on the file type (It is similar to droping a file into the workflow editor. The second parameter says if the file comes from a sequence file.pos=QPointF(0,0) prores=wf.addNode("ProRes",CbaseItem.NODETYPE_TASK) # add a prores file (From the Tasks group. this helps to diferenciate nodes that appear in more than one group (such us FTP) prores.pos=QPointF(300,0) # reposition the prores node (just for clarity) ftp=wf.addNode("FTP",CbaseItem.NODETYPE_OUTPUT) # add an ftp output node ftp.pos=QPointF(600,0) # reposition the prores node (just for clarity) file.getFirstConnectorByName("VideoOut").link(prores.getFirstConnectorByName("VideoIn")) # connect file->prores prores.getFirstConnectorByName("VideoOut").link(ftp.getFirstConnectorByName("File")) # connect prores->ftp #populate node properties file.gamma="Linear" # define source color space file.gamut="ACES (AP1)" prores.colorSpace="Rec2020" # define destination Color Space prores.resolution="HD 1080 (1920x1080)" # define destination resolution prores.displayFilter="watermark" # set a display filter called watermark ftp.url="ftp://ftp.sgo.es/" # set the destination ftp address once you have this kind of script, you can add it into a GUI menu button using the following steps: 1.- Write the script in your own myExample.py file There is a default location in SGO AppData/shared/scripts but you can write the script in any other directory 2.- Add it to the menu using the the bindPyFile command: i.e. lets suppose my py script is "c:/tmp/myExample/py"example and I want to create a command called "My Example" in the "menu bar->My Scripts" submenu I can use the following command: Mistika.app.bindPyFile("menuBar->My Scripts","My Example","c:/tmp/myExample/py",10) If "My Scripts" menu does not exist. it will be created as well. The number 10 represents the load priority, and it can be used to order the items in the menu (from lower to higher values ) This command will create a bind in the "SGO AppData/workflows/codeBinds" folder linking the menu and the created py file. to delete the menu, delete the bind file from that folder (the change is applied the next time the sw starts).
-
Hi Elliott, As soon as you put the token, the team directory should be populated. and once you select a team, the project populates, and so on. if the token is valid, your email should appear in the Email property. that is a confirmation that the connenction is stablished. If you do not see the email, maybe there could be a missing or extra character(s) in the token? the API link you mention is definitively the correct one. if you see nothing (nor mail/nor teams), do you see any error in the "Validation Inspector" window? if you want, save the mwf (removing your token) and mail it to support@sgo.es and we will be happy to check if we see anything wrong with it.
-
Hi Elliot, did you use the same mail address to buy the product and to login the forums? if that is the case, you should see the installer in the downloads section. in any case, you should also have received a mail order confirmation with the activation code. That mail also includes the links to the downloads kindly yours Miguel
-
Hi Rob, we have fixed the bug with the TC. if you want, I can contact you directly to send you an installer to test if it works for you kindly yours Miguel
-
please give us 24h to check this and we will get back to you ASAP.
-
Hi Rob, yes you can use workflows for that. let me give you some ideas for your issues: by default, workflows uses "_" as the separator for the frame number. but in your case, it could be a good idea to change it to ".". that will avoid the interference with the date field in your name convention To change it, go to Workflows->Name Convention Manager->Open Name Convention Manager and create one with this name convention: [path][baseName][.frame][.ext] After that, you can select it for your workflows with workflows->current Name Convention That way, the software will not detect the date as a sequence anymore. That should fix the tape name, and the time code issues in one go. by default transcoding nodes maintain the FPS and resolution nodes from the inputs. but you can overwrite the FPS field in the transcoder node properties. in Transcoding->FPS if you put 25 there, it will not retime the sequence, but write 25 in the output file as the new FPS (so the final sequence will last longer maintaining all the frames). There should not be any retimer applied. if you see any difference, it could be a bug, we will test it to be sure it is working correctly and update you ASAP
-
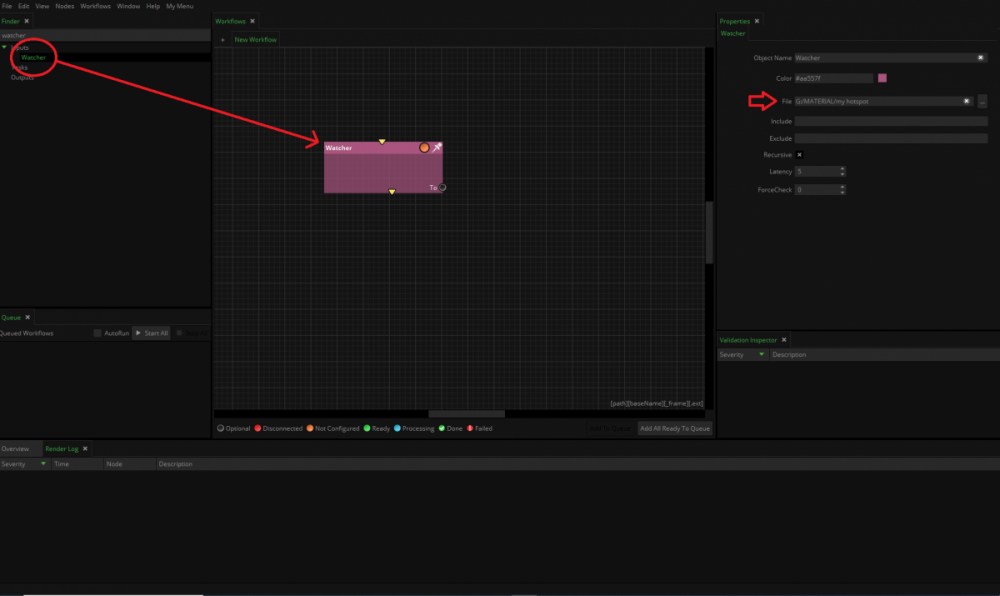
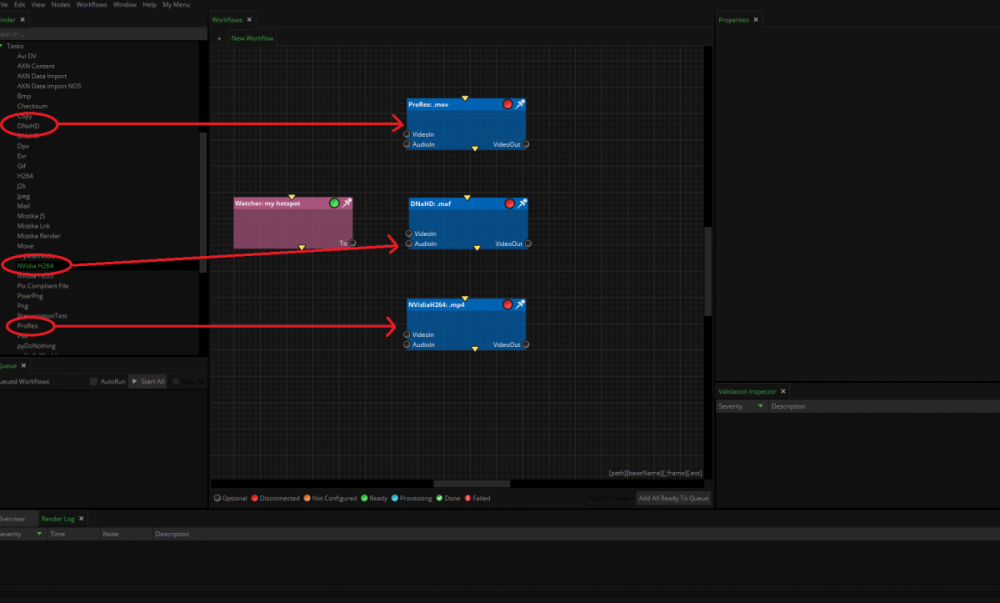
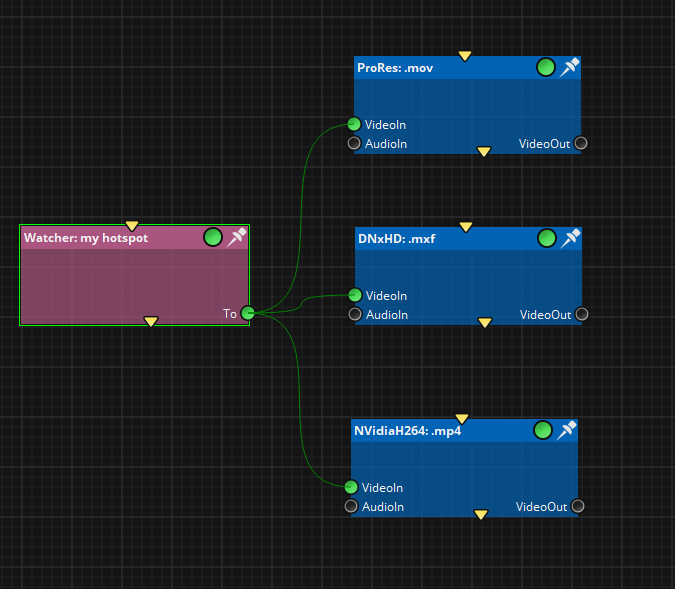
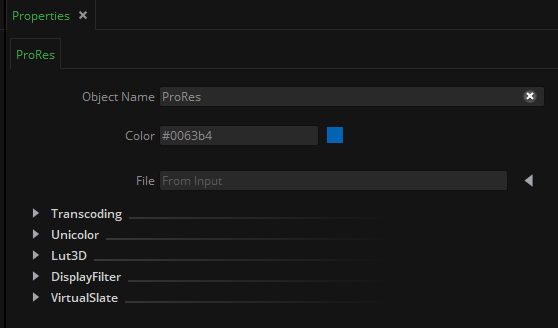
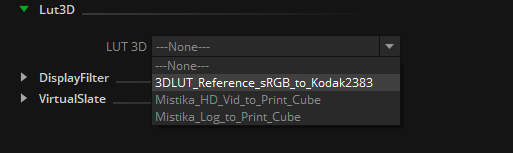
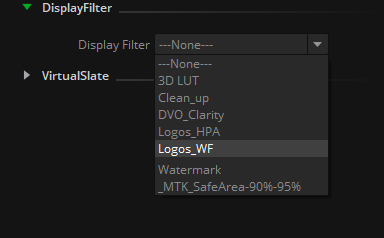
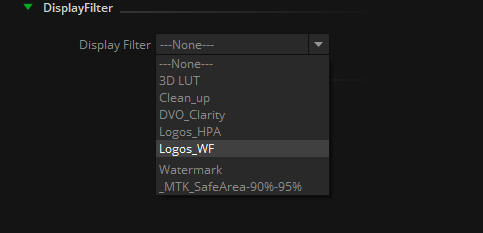
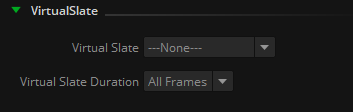
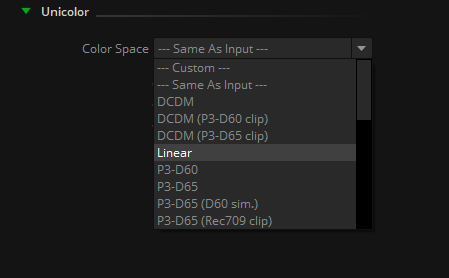
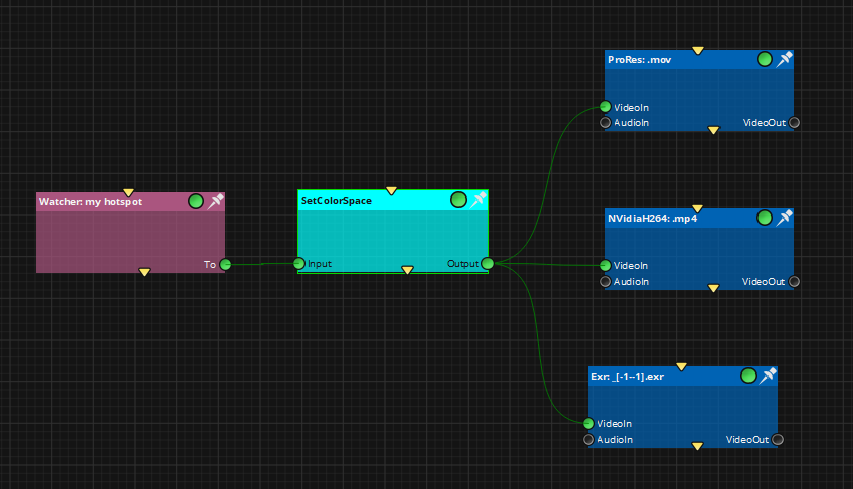
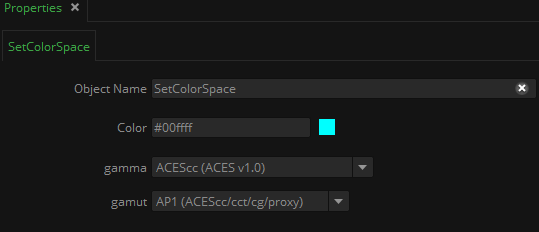
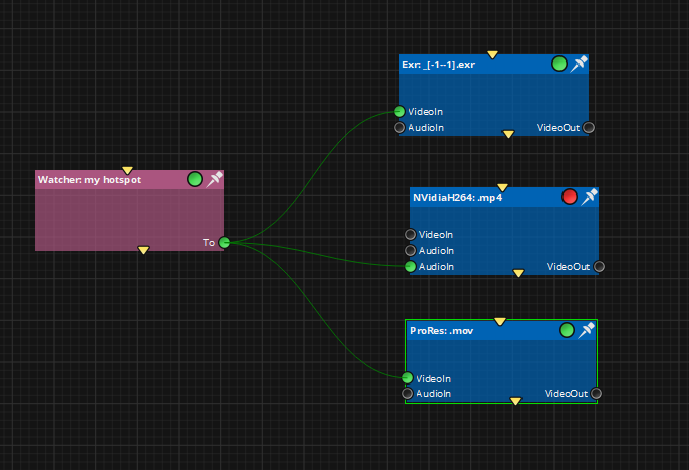
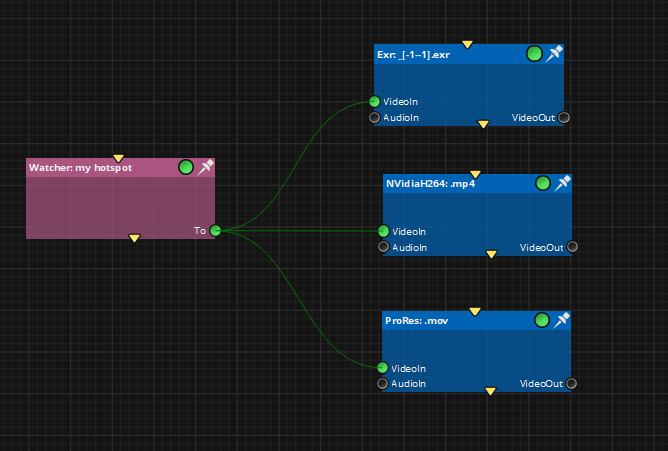
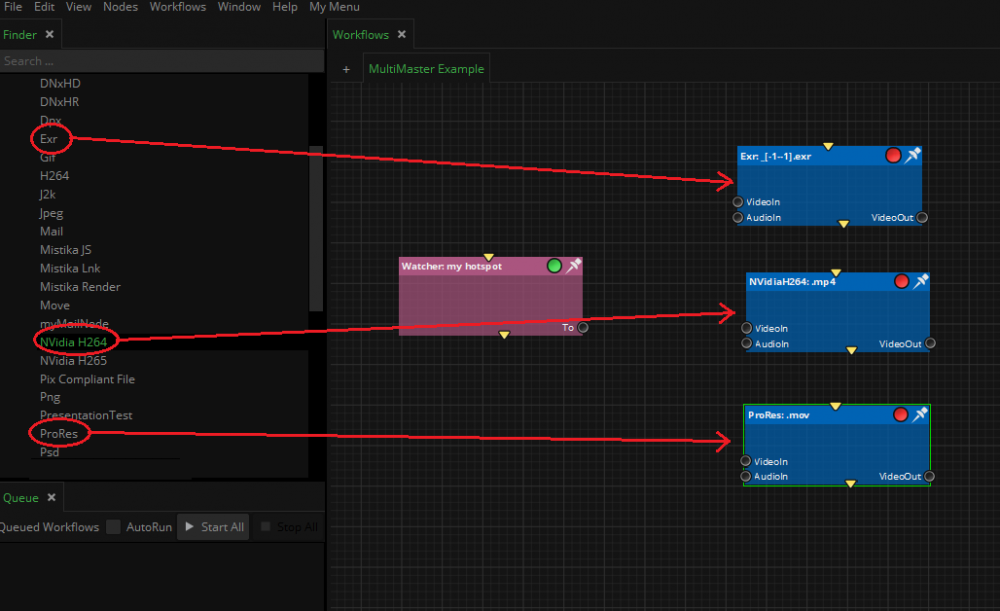
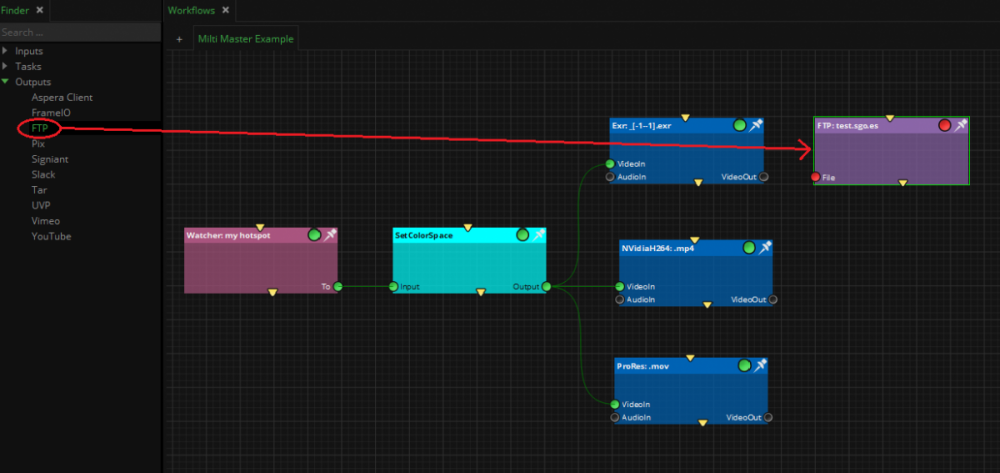
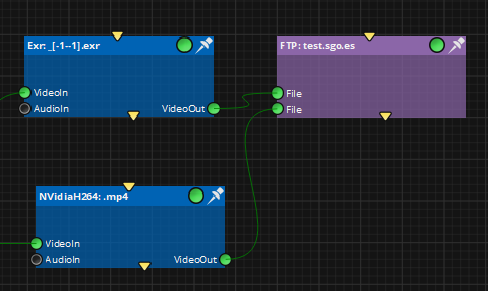
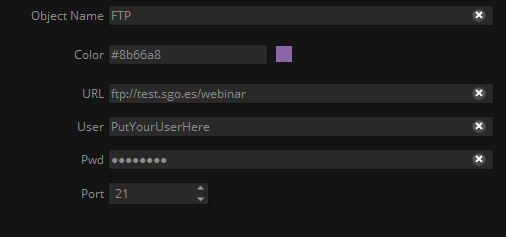
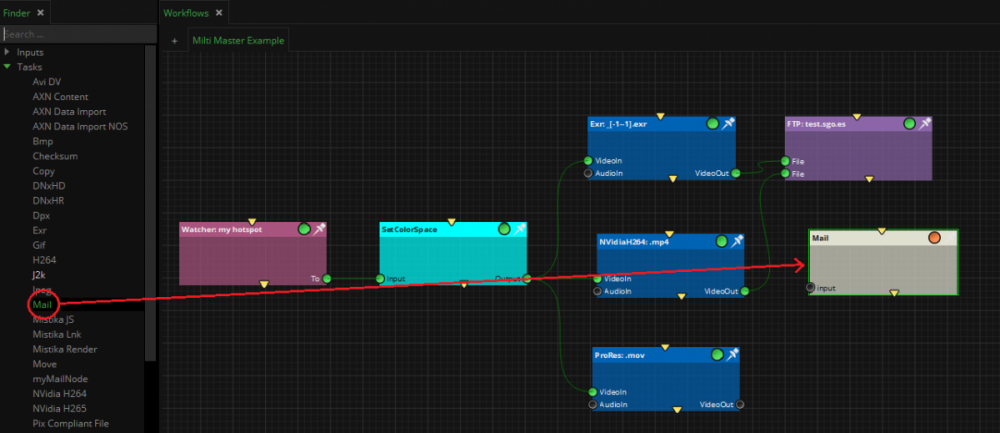
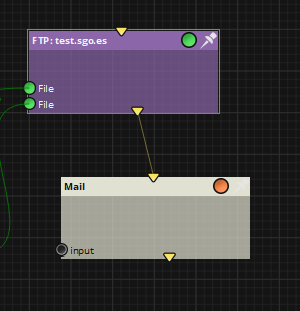
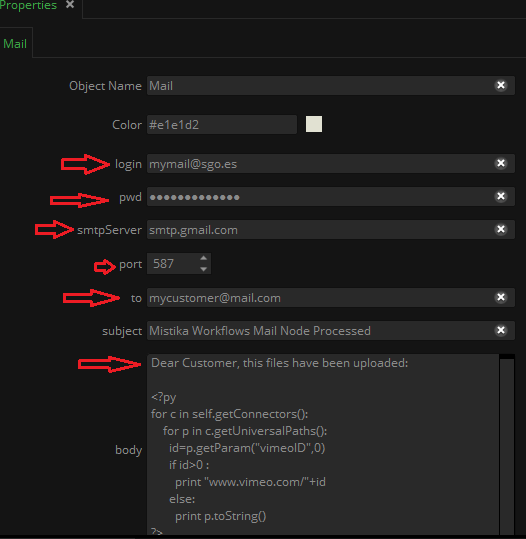
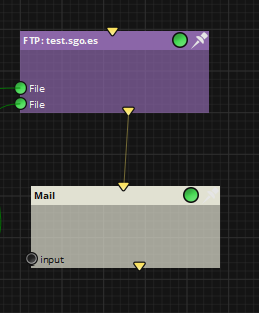
Five easy steps to automate multi-master deliveries Do you waste too much time preparing deliveries? Did you know you can automate multi-masters for only €49/month with our brand-new Mistika Workflows? This written tutorial will show you how to use Mistika Workflows to fully automate your multi-master delivery workflow. Download a free template of the multi-master delivery workflow described below by clicking HERE. To open and run this multi-master delivery workflow sample, you will need Mistika Workflows software installed on your computer. You can try this template with a completely free of charge Eval version and modify its settings and nodes according to your needs. Step 1: Define the folder to use First, we will define the folder in our system we want to use to generate the versions to be sent. In order to do that, head to the Inputs section Finder area, search for the Watcher node and drop it into the main Editor. Once the Watcher Node is created, set the folder you want to watch for the task in the properties area (In our example it is set to "G:/MATERIAL/my hotspot"). Step 2: Add the desired outputs Now it is time to define all the diferent versions you want to generate. They are all available in the Tasks section of the Finder. Drop the desired Nodes to the Editor. In our example, we want to generate one Prores version, an Exr sequence and one H264 movie, but you can choose from an extensive list of avaliable formats, including the most tipical movie formats and file sequences. Once the nodes are created, connect the To connector from the Watcher to the VideoIn connector of the 3 created nodes as in this picture: This will enable Mistika Workflows to send any content landing into the watched folder throught the transcoding tasks. Step 3: Configure the contents Now its time to configure any specific adjustments you want to add to the transcoding tasks. By default, no action is needed, but if you want to activate the Audio, rescale the content, add your logo or overwrite the TimeCode to the clip, etc. If you dont want to do any of these things, you can go directly to Step 4. In order to configure any of the transcoders, select it. In the properties area you will see all the posible parameters you can customize. Some tipical adjustments are: - Changing the Color Space: In our example, we are going to convert the Exr sequence to Linear Color Space. To do that, we select Linear in the Unicolor -> Color Space Property. This requires the input media to have a known Color Space. If it does not have it, the node will warn you. and you may need to add a "Set ColorSpace" node to manually define the input Color Space as in this picture: X In the Set ColorSpace properties, you can manually define the input color Space (if you know it): In this example, we are assuming the footage is coming in ACEScc Color Space, but you can select the correct one for your case. - Applying a LUT In the Lut3D section you will find the list of LUTs available. You can add any LUT you want to the system by adding it into the "SGO AppData/shared/3DLUTS" folder - Adding a Watermark or apply a FX Stack: In the DisplayFilter section, you will find the list of Display filters available. You can add any LUT you want to the system by adding it into the "SGO AppData/shared/display_filters" folder. The Display filters can be created with Mistika Boutique. Please visit the Mistika Boutique tutorials in order to learn more about Display Filters. - Adding The Time Code: In the Virtual Slate section, you will find the list of Virtual Slates available. You can add any LUT you want to the system by adding it into the "SGO AppData/shared/virtualslate" folder - Rescaling the ouput and/or adding the audio Track: Other functionalities, such as rescaling the output or including the input audio tracks can be defined in the Transcoding section of the Finder Step 4: Send the files to your customers In our example we want to upload the exr sequence as well as the h264 movie to one FTP server. To do that, we add a FTP output node from the Outputs Section , Aspera, Signiant. Then, we connect the Nodes we want to upload to the FTP node. In our example, the Exr and the H264 In the properties window you can configure your FTP settings: define the FTP server address, the user and password, as well as the port to use. Note: Other delivery methods such us Aspera, Signiant, are available. Step 5: Send Mail Notifications In order to send notifications, Mistika Workflows offers the Mail Node and the Slack Node. They can be used to send either an e-mail notification, or a direct message via Slack channel. In our example, we are adding a Mail notification. To do that, we add a Mail node from the Tasks section in the Finder. In the properties window you will find all the settings to configure the e-mail delivery, including the smtp server, port, user, password, as well as the destination email and the body message. The body text includes a python injection by default. That code will include automatically in the body the list of files connected to the node input. If there are no inputs, the list will be empty and only the text will be sent. Now, in order to send the mail when the FTP upload has finished, we can connect the reorder connector from the FTP node to the Mail node: That will force the mail to be sent when the FTP finishes. In order to include the name of the files into the mail body, you can also connect the input clip to the mail node as in this picture: This will not attach the file, but just mention the name as part of the mail body.


-
-
-
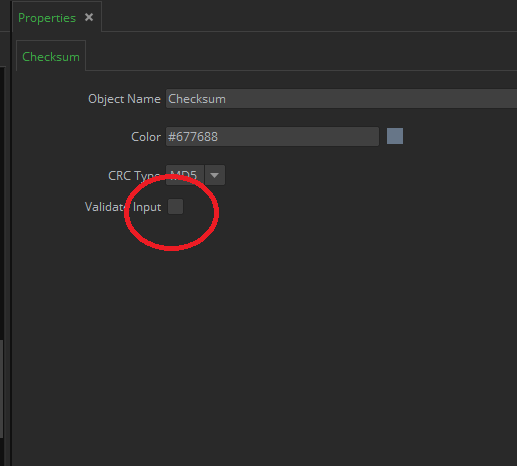
Hi Davd, in the first checksum (the one that generates it) you need to disable the "Validate Input" Property the logic is: if that property is ON, the checksum files are expected to exist, and are compared with the file (the file is validated) if the property is OFF the checksum files are generated (if they exist, they are overwritten) so in your workflow, the first checksum needs to have" Validate Input"=Disabled and the second one needs to have "Validate Input"=Enabled I hope this helps, kindly yours mad
-
this code has been updated slightly, but the logic to understand the code remains. Please refer to your Mistika Workflows installation to see the latest version of the code
-
Hi all, We have created a Py examplenode to upload videos to youtube as part of the Mistika Workflows process. It will be included in the next Open Beta. Meanwhile, in order to help users/developers to use it and understand the code, let me explain the code: In order to use it, you may need to install the following py modules in your system (if they are not installed already): google-api-python-client oauth2client httplib2 argparse the initialization function: def init(self): self.addConnector("File",Cconnector.CONNECTOR_TYPE_INPUT,Cconnector.MODE_REQUIRED) self.addConnector("Output",Cconnector.CONNECTOR_TYPE_OUTPUT,Cconnector.MODE_OPTIONAL) self.addProperty("mail","") self.addProperty("title","test upload. to be deleted") self.addProperty("description","File uploaded with Mistika Workflows") self.addProperty("category",22) self.addProperty("keywords") self.addProperty("privacyStatus","public") self.addProperty("loginTimeout",30) return True - The Connectors: The node has 2 connectors: "File": the input movie(s). Their format must be already compatible with youtube. In order to do that, you can use any previous Transcoding node. "Output": The output connector will include the input universal Paths including a new parameter with the video youtube ID. That way, it can be used in the following nodes, i.e. to send a link by mail, or slack. - The Properties: The Node uses 7 properties mail: This mail is used to store the Youtube access Token. title: The video title. description: The video description. category: The Youtube category number. The names are defined in the .xsd file, and the default (22) correspond to "People & Blogs category" keywords: comma separated keywords, privacyStatus: It can be Public, Private or Unlisted. Default is Public. loginTimeout: It is a hidden parameter with the login process TimeOut. After that time, if the user does not grant access permissions in the web Browser, the process will fail. the validation function: def isReady(self): res=True if not self.mail: res=self.critical("youtube:isReady:mail","email can not be Empty") if not self.title: res=self.critical("youtube:isReady:title","Title can not be Empty") if not self.description: res=self.critical("youtube:isReady:description","Description can not be Empty") return res The validation funcion is very simple, it just checks that the mail, title and description files are not empty. -The process function: def process(self): out=self.getFirstConnectorByName("Output") out.clearUniversalPaths() res=True success = False port_number = 0 args = argparser.parse_args() socketError=False httpd=None timeout=self.loginTimeout for port in args.auth_host_port: port_number = port try: httpd = ClientRedirectServer((args.auth_host_name, port),ClientRedirectHandler) httpd.timeout=timeout except socket.error,e: socketError=e pass else: success = True oauth_callback = 'http://{host}:{port}/'.format(host=args.auth_host_name, port=port_number) break if not success: self.critical("youtube:process","unable to start local web browser: %s" %socketError) if (httpd): closeServer(httpd) return False print('server running on port {}'.format(httpd.server_port)) for c in self.getConnectorsByName("File"): for p in c.getUniversalPaths(): file=p.filePath() print "uploading %s" % file id=uploadFile(self,file,args,httpd,oauth_callback) if id: p.setParam("youtubeId",id) out.addUniversalPath(p) else: res=False closeServer(httpd) return res The process funcion first creates a server to process the youtube identification callback in the local computer. That server will listen the ports 8080 or 8090 if they are not used already. Once the server is created, the node will process all the input connectors and all their universalPaths to upload them to YouTube. The upload Process: The upload process is based on the youtube example available at https://developers.google.com/youtube/v3/docs/videos/insert In that link you can find details about that part of the process. The code is pretty much maintained from that example, we just made the necesary adjustments to make it work inside Mistika Workflows. The only significant change was to move the server creation outside the uploadFile function to avoid creating and destroying the server for every upload, doing it once instead. So, the full node code is the following: import httplib import httplib2 import os import random import sys import time import logging import socket from argparse import Namespace from googleapiclient.discovery import build from googleapiclient.errors import HttpError from googleapiclient.http import MediaFileUpload from oauth2client.client import flow_from_clientsecrets from oauth2client.file import Storage from oauth2client.tools import run_flow,argparser,ClientRedirectServer,ClientRedirectHandler from oauth2client import client from Mistika.classes import Cconnector def init(self): self.addConnector("File",Cconnector.CONNECTOR_TYPE_INPUT,Cconnector.MODE_REQUIRED) self.addConnector("Output",Cconnector.CONNECTOR_TYPE_OUTPUT,Cconnector.MODE_OPTIONAL) self.addProperty("mail","") self.addProperty("title","test upload. to be deleted") self.addProperty("description","File uploaded with Mistika Workflows") self.addProperty("category",22) self.addProperty("keywords") self.addProperty("privacyStatus","public") self.addProperty("loginTimeout",30) return True def isReady(self): res=True if not self.mail: res=self.critical("youtube:isReady:mail","email can not be Empty") if not self.title: res=self.critical("youtube:isReady:title","Title can not be Empty") if not self.description: res=self.critical("youtube:isReady:description","Description can not be Empty") return res def process(self): out=self.getFirstConnectorByName("Output") out.clearUniversalPaths() res=True success = False port_number = 0 args = argparser.parse_args() socketError=False httpd=None timeout=self.loginTimeout for port in args.auth_host_port: port_number = port try: httpd = ClientRedirectServer((args.auth_host_name, port),ClientRedirectHandler) httpd.timeout=timeout except socket.error,e: socketError=e pass else: success = True oauth_callback = 'http://{host}:{port}/'.format(host=args.auth_host_name, port=port_number) break if not success: self.critical("youtube:process","unable to start local web browser: %s" %socketError) if (httpd): closeServer(httpd) return False print('server running on port {}'.format(httpd.server_port)) for c in self.getConnectorsByName("File"): for p in c.getUniversalPaths(): file=p.filePath() print "uploading %s" % file id=uploadFile(self,file,args,httpd,oauth_callback) if id: p.setParam("youtubeId",id) out.addUniversalPath(p) else: res=False closeServer(httpd) return res # YouTube auxiliary functions. # Based in google example available at https://developers.google.com/youtube/v3/docs/videos/insert def uploadFile(self,file,args,httpd,oauth_callback): if not os.path.exists(file): self.critical("youtube:upload:fileNotFound","File Not Found: %s" % file) return False httplib2.RETRIES = 1 MAX_RETRIES = 10 VALID_PRIVACY_STATUSES = ("public", "private", "unlisted") setattr(args,'file',file) setattr(args,'title',self.title) setattr(args,'description',self.description) setattr(args,'category',self.category) setattr(args,'keywords',self.keywords) setattr(args,'privacyStatus',self.privacyStatus) youtube = get_authenticated_service(self,args,httpd,oauth_callback) if (youtube): try: id=initialize_upload(self,youtube, args) except HttpError, e: self.critical("youtube:upload:httpError ","An HTTP error %d occurred:\n%s" % (e.resp.status, e.content)) return False return id return False def get_authenticated_service(self,args,httpd,oauth_callback): CLIENT_SECRETS_FILE = "{}/youtube/workflows.json".format(sgoPaths.workflowsLibrary()) YOUTUBE_UPLOAD_SCOPE = "https://www.googleapis.com/auth/youtube.upload" YOUTUBE_API_SERVICE_NAME = "youtube" YOUTUBE_API_VERSION = "v3" flow = flow_from_clientsecrets(CLIENT_SECRETS_FILE,scope=YOUTUBE_UPLOAD_SCOPE) CREDENTIALS_FILE = "{}/{}".format(sgoPaths.tmp(), self.mail) storage = Storage(CREDENTIALS_FILE) credentials = storage.get() if credentials is None or credentials.invalid: credentials = run_touyube_flow(self,flow, storage, args,httpd,oauth_callback) if credentials: return build(YOUTUBE_API_SERVICE_NAME, YOUTUBE_API_VERSION, http=credentials.authorize(httplib2.Http())) return False def initialize_upload(self,youtube, options): tags = None if options.keywords: tags = options.keywords.split(",") body=dict( snippet=dict( title=options.title, description=options.description, tags=tags, categoryId=options.category ), status=dict( privacyStatus=options.privacyStatus ) ) insert_request = youtube.videos().insert( part=",".join(body.keys()),body=body,media_body=MediaFileUpload(options.file, chunksize=-1, resumable=True) ) return resumable_upload(self,insert_request) def resumable_upload(self,insert_request): RETRIABLE_EXCEPTIONS = (httplib2.HttpLib2Error, IOError, httplib.NotConnected, httplib.IncompleteRead, httplib.ImproperConnectionState, httplib.CannotSendRequest, httplib.CannotSendHeader, httplib.ResponseNotReady, httplib.BadStatusLine) RETRIABLE_STATUS_CODES = [500, 502, 503, 504] response = None error = None retry = 0 id=False while response is None: try: print "Uploading file..." status, response = insert_request.next_chunk() if response is not None: if 'id' in response: print "Video id '%s' was successfully uploaded." % response['id'] id=response['id'] else: critical("youtube:resumableUpload:unexpectedError","The upload failed with an unexpected response: %s" % response) return False except HttpError, e: if e.resp.status in RETRIABLE_STATUS_CODES: error = "A retriable HTTP error %d occurred:\n%s" % (e.resp.status,e.content) else: raise except RETRIABLE_EXCEPTIONS, e: error = "A retriable error occurred: %s" % e if error is not None: warning("youtube:resumableUpload:error",error) retry += 1 if retry > MAX_RETRIES: critical("youtube:resumableUpload:maxRetries","No longer attempting to retry.") return False max_sleep = 2 ** retry sleep_seconds = random.random() * max_sleep print "Sleeping %f seconds and then retrying..." % sleep_seconds time.sleep(sleep_seconds) return id def run_touyube_flow(self,flow, storage, flags, httpd,oauth_callback): logging.getLogger().setLevel(getattr(logging, flags.logging_level)) flow.redirect_uri = oauth_callback authorize_url = flow.step1_get_authorize_url() import webbrowser if (webbrowser.open(authorize_url, new=1, autoraise=True)): timeout=self.loginTimeout self.info("youtube:run_touyube_flow:webbrowserOpen","Please use the raising web browser to sign in your Google account (Timeout: {:d} secs)".format(timeout)) else: self.critical("youtube:run_touyube_flow:webbrowserFailed","Unable to open Web Browser") return False code = None httpd.handle_request() if 'error' in httpd.query_params: self.critical("youtube:run_touyube_flow:rejected","Authentication request was rejected.") return False if 'code' in httpd.query_params: code = httpd.query_params['code'] else: self.critical("youtube:run_touyube_flow:codeNotFound","Unable to find authentication code") return False try: credential = flow.step2_exchange(code) except client.FlowExchangeError as e: self.critical("youtube:run_touyube_flow:failed",'Authentication has failed: {0}'.format(e)) return False storage.put(credential) credential.set_store(storage) self.info("youtube:run_touyube_flow:success",'Authentication successful.') return credential def closeServer(httpd): httpd.socket.close() httpd.shutdown
-
Hi Rakesh, at the moment, we need to add the functionality to sync the by TC into the Workflows nodes. that should not be very difficult, as we currently have the functionality in Boutique. about embedding the metadata, we would need more info about how it (what format does the audio have, and what metadata does it have, and where do you want to embed it I dont think we can do both things for these weekend, but we will add it to the software, so you will hopefully have it next time you need it Cheers!
-
Hi Matt, it took a bit longer than expected to release the new Beta, but it is available now for download. Thanks for the patience!
-
Hi Matt, Yes, the "write error" has been fixed together with many other things and new features. The upload of the latest beta was delayed due to the summer but we will probably upload it just after IBC (end of next week)
-
Hi Jeff, Thanks for the feedback. we are fixing that, and in the next Beta installer it will be configurable in the Files->Preferences->frame.io section (At the moment, the section exists, but it is empty. we need to fix that) about transcoding metadata/GUI and bug fixing, we are working on a big revamp of that aspect of the software, we will not close the Beta phase of the product until we do it, but it will take some time. you may need to wait few betas before you see the final development of that part thanks again for the feedback!
-
Hi all, This is just an update on what we are preparing for the next betas. Based on the feedback, here is the list of functionalities we are implementing/fixing: H264 codec names made clearer to make them easier to understand. A render warning is given if AudioCodec is set to None, but the transcoder node has audio inputs. A new "streaming universal paths" mode has been added to allow nodes to provide multiple outputs using a single connector. Move and Copy nodes now have an output to provide all the inputs in a single output connector to allow chaining actions to their output. Move and Copy nodes have been moved to Tasks group Some missing Qt libraries have been added to linux to give access from Python The workflows can now be queued from the overview window A new AutoRun mode starts automatically queued workflows Slack Integration on top of this, we are working on a revamp to improve the amount of metadata exposed from the codecs, as well as improving the properties GUI, although these functionalities may not be available in the next Beta but the following one. there are also some other requests we are studying but we can not give dates for them. they are: Linux installation failing if the user pwd has special characters. Improving the render progress indicator and maybe Pix Integration Thank you all again for the great feedback, and please, feel free to keep giving us your requests for the product. we will be happy to try to make them happen!
-
Hi Jan, after analyzing your feedback, let me add some more info to my previous comments: We have reproduced the problem here. we are working to fix it for the next beta. thanks for your support on this we are working on a deep revamp of that area. we will definitely improve it before the release. In this direction we want to improve 2 things: - the way to configure the codecs (making it more intuitive, and giving access to more parameters) - The metadata displayed from the movies. as it is currently very limited and we are receiving a lot of requests to improve that too I hope, after the revamp, these aspects will improve. we are fixing this as we speak. it will definitely be fixed in next beta. The node will give a warning if the audio codec is "None" but the input has audio channels this sounds easy to be added. we will try to add it for next beta too. thanks again for your feedback!
-
Audio in Movie is either aac or uncompress depending on the format. but it is obviously not clear at all in the GUI as it is not mentioned. We are revisiting that with the other GUI comments you gave us. We want to give a mayor revamp to the way we manage the codec settings
-
Sure. it will be used internally to reproduce the problem and deleted afterwards.
-
is that footage test footage? if so, would it be possible to have a copy of it to reproduce the problem? (by mail to me or to support). if it is not test and, we will try to reproduce it either way. thanks again!
-
Thanks for the Feddback! about the problem, pls let us check it and we will get back to you ASAP


