rob.gordon
Members
-
Joined
-
Last visited
Everything posted by rob.gordon
-
Thank you! I’ve sent you a messenger message! Rob.
-
So further to this I’ve just tried another .avi file. This time I still get the 1 frame shift but, interestingly, Ultima places a repeat frame of the first frame in the ‘source’ file and loses the last frame. Could it be that Ultima isn’t handling the .avi correctly where as Workflows is? This is all very interesting!
-
Thank you both for the replies. I’ve tried changing the name convention as you suggest, Miguel, but then the process just errors out and says ‘No input file(s) found’ - I am guessing it really needs to see a frame number in the filename to be happy so I tried naming my source file A001_B001_1234_200730.000000.avi to see if adding the .000000 before the extension would make it happy, but it was then giving an error saying ‘Unable to create Render’. The only time it seems happy is when it has the [_frame] in the name convention? I tested another file with the FPS change and this time it kept the first frame but dropped the 5th frame and from there it was 1 frame out of sync with the source, so there is definitely something unusual going on with how it is handling the FPS change, but it appears that you have been able to recreate this issue there so hopefully you can solve that one. Thank you so much, I feel that Workflows has the potential be a really useful tool! Rob.
-
I’ve done some more investigation into the frame rate issue. Workflows IS just keeping the rendered file frame for frame, which is good. If I align the ProRes file made in Workflows with the source file in Ultima they aren’t in sync, despite the timecode matching. If I move the Workflows file down by 1 frame then the two files are in sync but not timecode alignment. It seems the Workflows file misses the first frame in the sequence but the source file in Ultima is missing the last frame of the sequence! So each file, despite being the same length contains a unique first or last frame, the source file having a unique first frame and the Workflows file having a unique last frame! I’m confused how this is possible? Any suggestions as to the reason why Ultima and Workflows would present a file differently?
-
Hi there. I have the perfect project that I wanted to use Workflows for but unfortunately there seems to be a few issues that I am unable to resolve that you might be able to help with? I have files from a camera without proper filenaming or timecode so I need to generate files that are usable within a post production workflow. My plan was to create ProRes master files to use in the online and MXF Avid media for the offline, an easy task for Workflows you would think? My first issue is that in order to rename the source with a consistent structure my files end in the date so for example: A001_B001_1234_200730.avi - Workflows takes the last numbers of the file, in this case my date string (200730) and strips it from the filename and uses this as the timecode generator. This is fine for a file sequence where you may want the frame numbers removed but that may not be what you want to use as the timecode, also it removes that string from the filename but leaves it intact for the tapename field so I end up with ProRes and MXF files with the incorrect filename but the correct tapename and wrong timecode! If I ‘ cheat’ the system and add _000000 to the end of the source filename I can get Workflows to generate the correct timecode that I am after (in this case 00:00:00:00) and filename but the _000000 is left in for the tapename! There needs to be an option to force timecode to be a specific value within the parameters of the node, especially when there is no embedded timecode in the source media and the same with tapename. There needs to be an easy way to ensure that the tapename can be generated consistently with the filename. The second issue is with frame rate. My source files are inconsistent frame rates but I need to bring a consistent value to them. In this case, sources can be 30fps but I need to make everything 25fps. The way Workflows handles this is inconsistent with the way Ultima handles it. I do not need any sort of retime, I just need to tag the newly generated files with the updated frame rate. If I being the source media into Ultima in a 25 FPS project and keep it frame for frame and compare it to what Workflows has generated the duration matches but there is some shift in the actual image timing? It is like Workflows is applying some sort of retime when changing frame rate rather than just tagging the files as the intended frame rate? Any advice appreciated or if any of those Missing features could make in into a future release I would really appreciate it! Thanks.
-
-
HI there, I'm after any advice on a way to be able to pull a difference key on Mistika. I can use the channels effect to isolate differences but there seems to be no way (that I have found yet) to actually be able to pull a useable difference matte from a clean plate? Any advice or workarounds appreciated. Thanks.
-
Yes the Comp3D can perform a similar calculation. There is a 'math' tab in the visual editor for the Comp3D node, this has a parameter for 'speed' to ensure your move does so in whole pixels. The equation is (100/vertical resolution) x (pixel per frame) x 200 so a 4ppf roll in a 1080 project would be (100/1080) x 4 x 200 = 74.07%. Highlight the position Y parameter in the layer of your file and type in the speed percentage of 74.07 in the speed box in the math tab and you will have your move rolling at whole pixels as defined in the equation. This is also assuming you have pre-calulated the duration required for the roll of the size of the file you have created, in the case above of a 4ppf roll. If you have created a file of 1920x23000 you would take the 23000+1080 (the vertical resolution of your project)/4 (the required pixel per frame) which makes a duration of 6020 frames. Hopefully that makes sense!
-
Just save the stack as an environment and then copy that .env file to a different Mistika? Maybe you are wanting something more of a preset though? In which case save an FX preset? There will always be issues though if both Mistika's don't have the same typefaces installed. The other option is to do a dummy render and copy the .RND file to the other Mistika, then you can just drag that .RND file to the new timeline and ungroup it. (The RND files get saved into the RENDER folder of your current project)
-
Yes you are right about title and framing not having motion blur ? I do the same, just add a little dirblur to help. Just an FYI, if you use a comp3d node to perform the move (or any move), in the options setting you can increase the 'samples' to x8 or more and adjust the 'shutter' variable to give you motion blur! Works nicely!
-
For me, I find it much easier to make a long file in photoshop (eg 1920x25000) and then just bring that into Mistika and use comp3d to roll it to the correct pixel per frame duration. Laying out text in the title tool in Mistika can be quite painful at times trying to get all the formatting correct. If you save the photoshop file to a working location then for changes you can just overwrite a new file with the same name and it will update in the Mistika timeline!
-
Hi there, Does the beta test officially end soon as I am getting the license expiry notification in 5 days? Are we allowed to play with Boutique for longer?
-
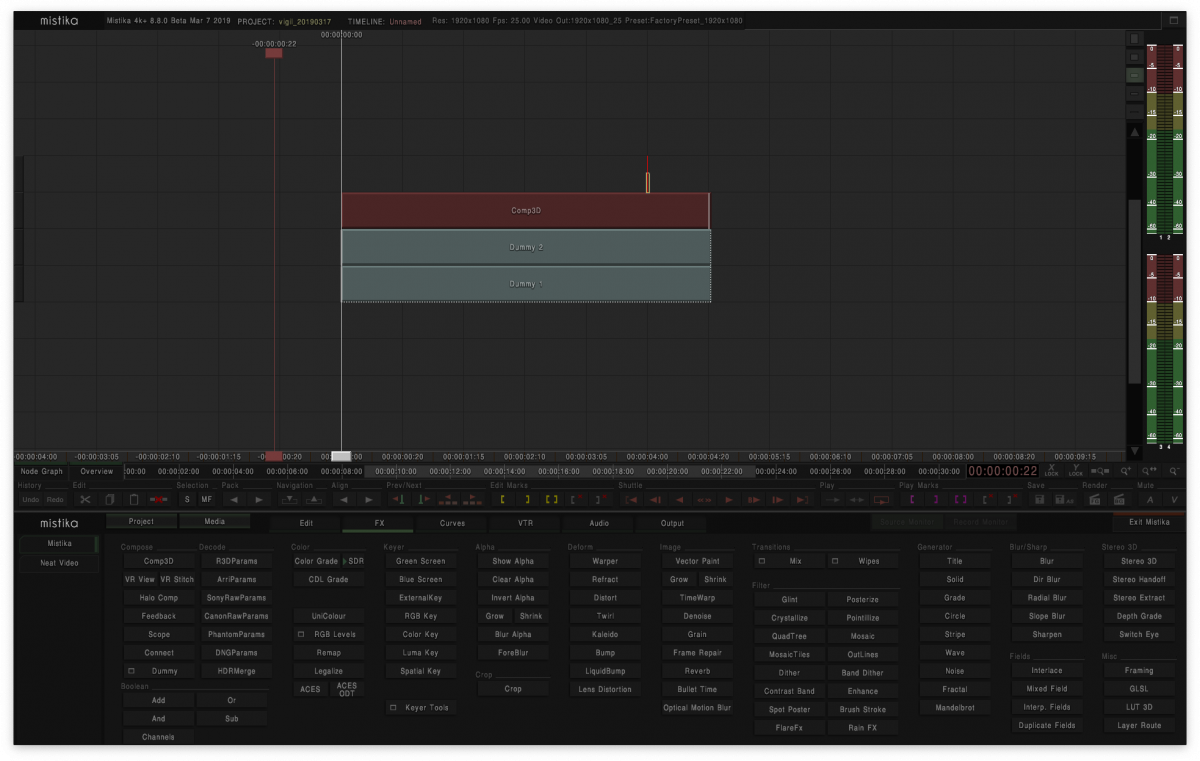
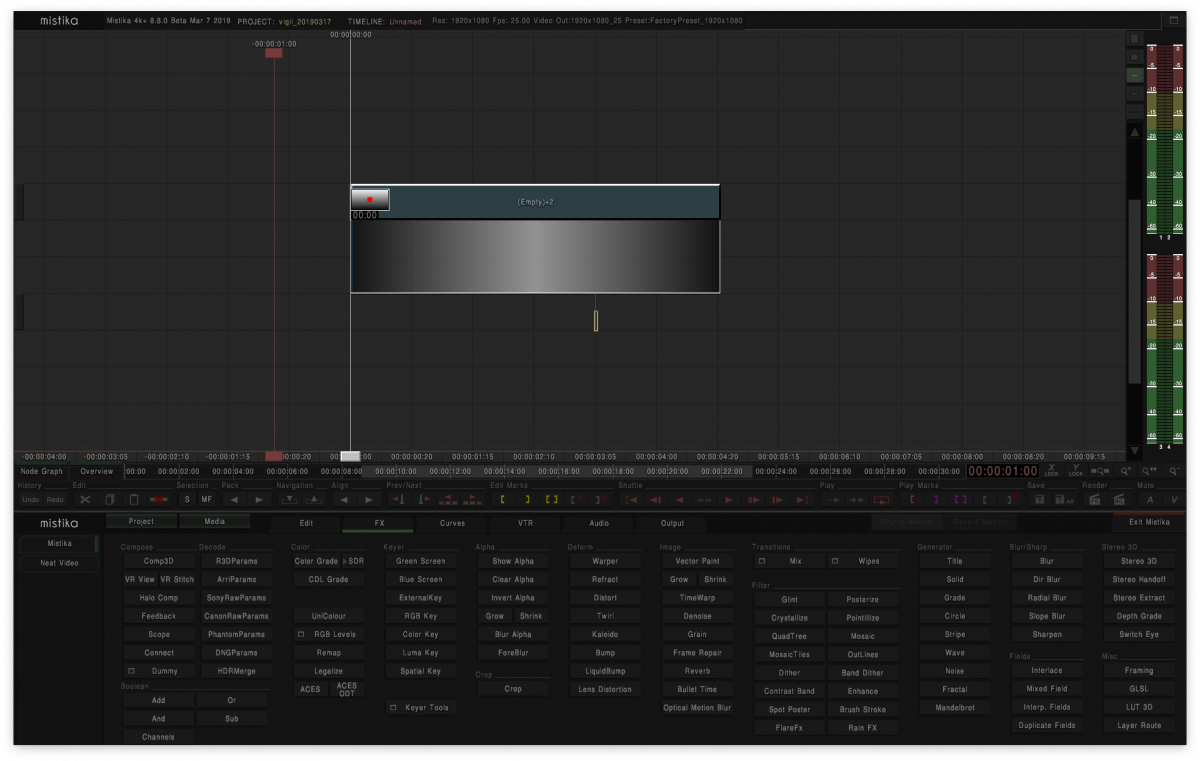
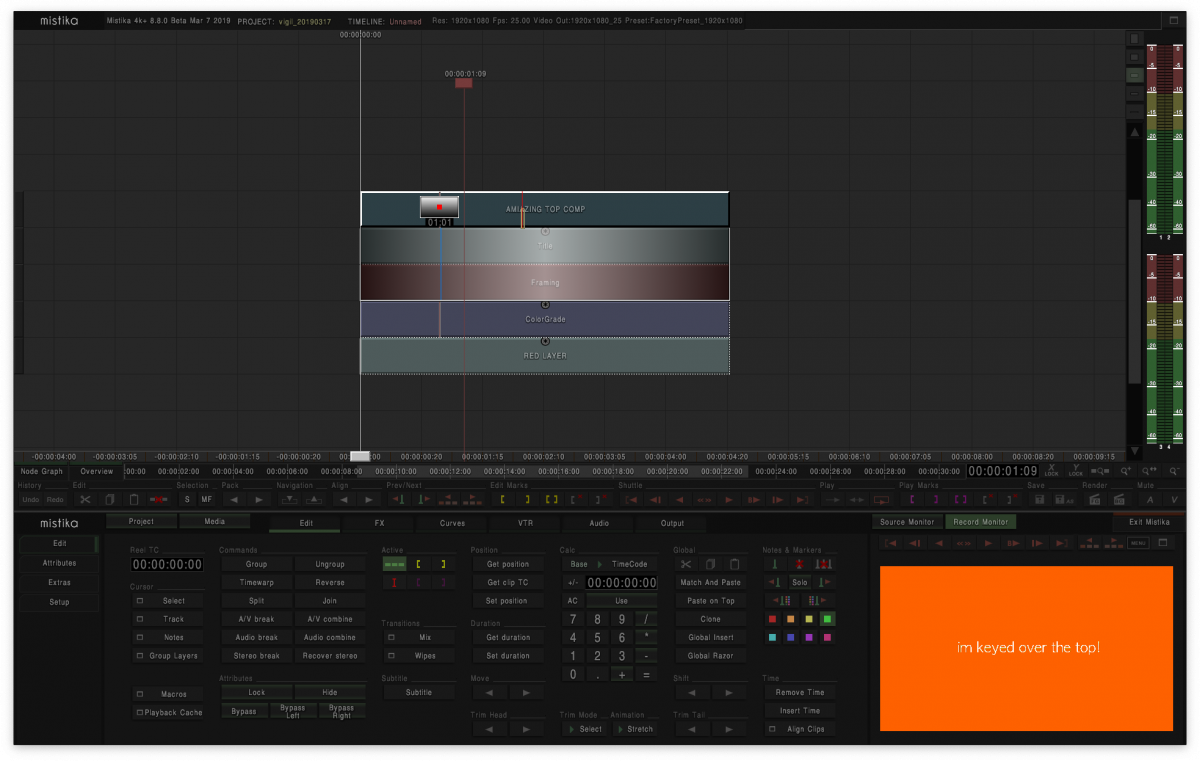
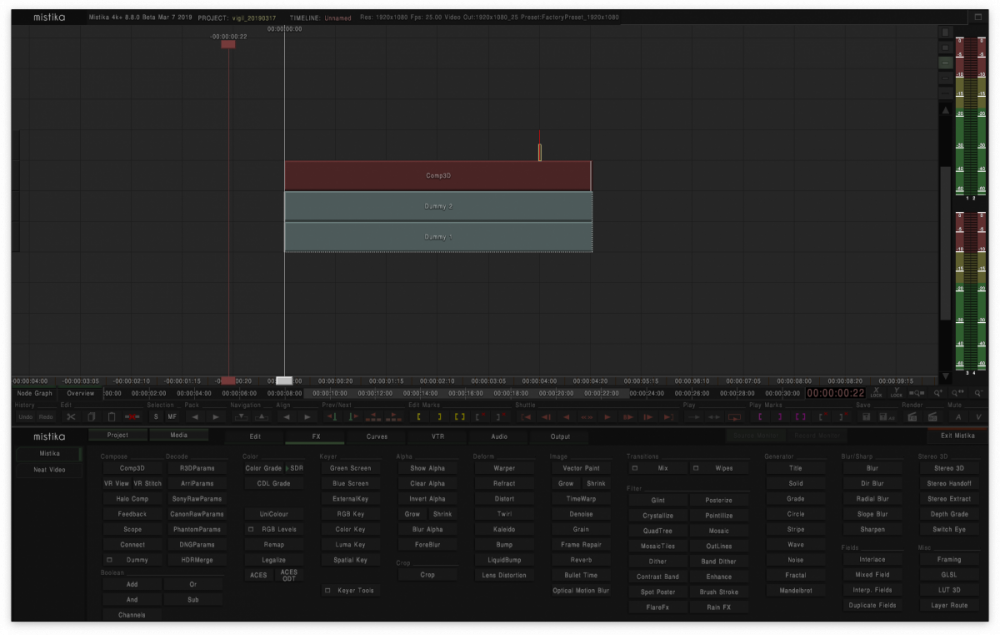
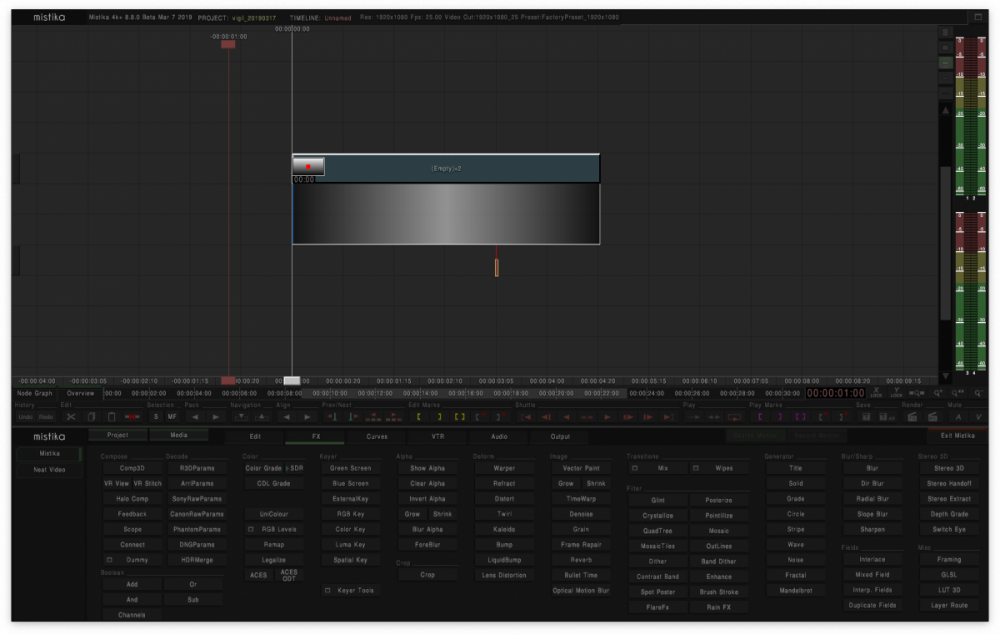
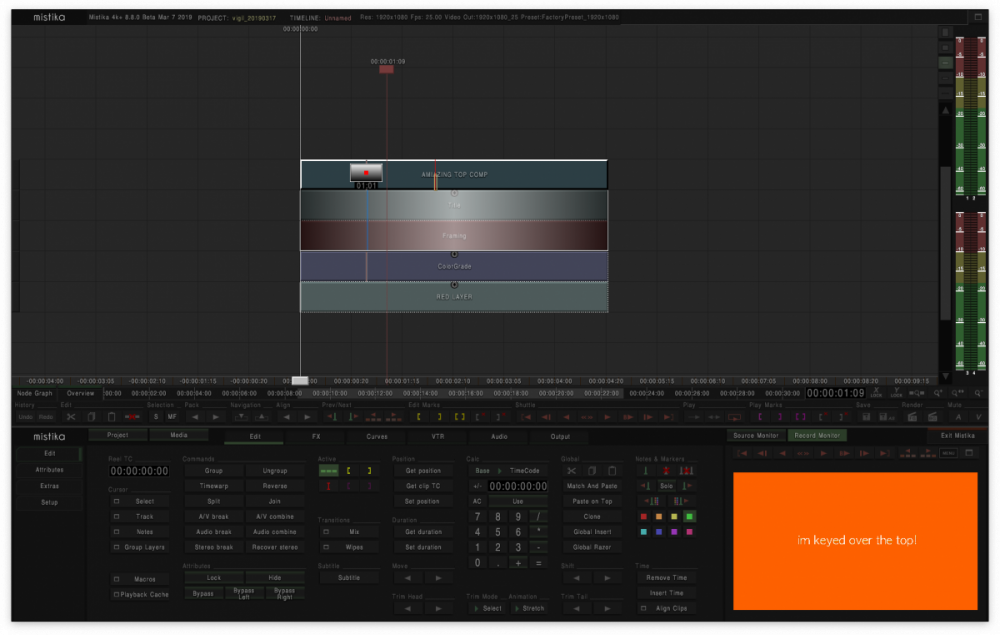
There is a 'workaround' if you want to make a 'comp' that you just put on top of a stack to key something over the top, like a graphic or a title with an alpha channel. I use this a lot for things like subtitles where I want them all at the top of a stack without having to have clips/nodes top and bottom of the stack. The trick is to create a 'dummy' comp. This is achieved by using a comp3d node and then add two dummy clip inputs. These are found in the FX tab in the 'compose' section on the left hand side. The dummy clips are numbered to represent the inputs, so if you have a comp3d node with a dummy2 directly below it and a dummy1 directly below that (dummy 2 has to be above dummy 1 to keep the input order correect) then you have created a 'traditional' style stack. If you then group that stack using the group function in the edit tab under 'commands', this is when the magic happens and that group becomes 'huggable' with an adjustable scope - so you can now put that new node you created at the top of your stack with whatever you want to key directly below that and then adjust the scope (hug) of the node down to the top of your master stack and hey presto, you have an element keyed over the top is a traditional style. You can adjust all the key setting in the comp3d within the dummy group you have made for things like sizing or combine mode if you don't have or want to use an alpha channel etc. This means you can set up a single node that you can key titles with and add a drop shadow etc etc. (Please SGO add a drop shadow option to the title node!!!) Hopefully that makes sense? It sounds confusing but is actually really simple and allows you to do simple comps and layers in a more traditional style and keep those comps on an easy layer to hide should you want to make textless versions of things etc etc.
-
As long as your project is as large as your biggest resolution you can use the scaling option in the settings (gear icon) in the output tab to rescale each clip. Obviously you need to change this manually on a per clip basis and your clips in the timeline will need an appropriate framing node; but at least it means you don't need to keep switching between setups/project resolutions for each export.
-
All good! I can imagine you are very busy with NAB! Sorry that was my misunderstanding that the link you posted was for the new tutorials you mentioned in your last post!
-
There is a workaround for that, if you group the layer you want to split conform with the layer you use as the reference for the split, if you step into that group and perform the split conform it will only split what is in the group. Once done, step out of the group and ungroup it. The group function is very useful for doing a lot of things independent from the main workspace!
-
Thanks for that link but there doesn't seem to be any tutorials about specifically using the VR STITCH node in Boutique rather than the VR to Boutique/Ultima workflow? It would be really good to understand what the capabilities are and how to stitch VR using Boutique/Ultima only.
-
You can also just use the 'sub' node which you can find in the Boolean section of the FX tab (bottom left corner). If you use a framing node to make sure your offline reference is framed correctly to the project (which I usually then just group with the offline reference) then just add a 'Sub' on top of the offline and adjust the focus to 'hug' (sorry this is the term I use for the Mistika focus - I like to think of nodes 'hugging' their inputs!) your conformed footage and you have an instant subtract effect without the need for a Comp3D or setting up any FX preset. I use this as my method of choice and fall back to a diagonal wipestripe fx as an alternative. Mistika really is the best system out there for being able to compare offline to online. The flexibility of the workspace is outstanding.
-
Thank you!
-
Thanks for those!
-
There is a workaround for the mass scope adjust. If you 'lock' all the FX nodes by selecting them and using the shortkey 'L' (or the 'Lock' button in the Edit tab under 'Attributes') to lock them, when you drag the scope all locked nodes will then change their scope together. Just remember to unlock the nodes again afterwards! This only works moving the scope itself up and down so you will need your FX nodes on the correct 'layer' first and then just lock them and drag the scope down to the required level. As far as I am aware I don't **think** there is any shortcut to actually move the scope other than using the mouse or tablet?
-
Thank you Miguel! I think Boutique is an exciting product for SGO and I look forward to giving it a good test drive!
-
Hi there. Just downloaded the Beta and it's all looking great so far. Does the download come with any of the VR camera preset .grp files? Also, is there anywhere online that has an in-depth tutorial of the VR Stitch node? I've had a look at the extensive Mistika VR tutorials and whilst some of the controls crossover it's difficult to apply those to the VR Stitch node and would be really great if there was a tutorial based purely for Boutique/Ultima. Thanks. WIll shout when/if I find any bugs! Rob.