
Posts posted by Cristobal Bolaños
-
-
I'm afraid that shapes don't interact directly with OFX effects. However, after creating a shape, if you set the options mode in RGBxA, then duplicate the stack without the Effect, put it on top, and then embrace everything with a Comp3D, it will compose both shots putting on top the shape with the modification.

Cheers,
Cristóbal-
 1
1
-
-
-
Hi!Many thanks for the feedback Jan and Jeff!We are working on Mistika's GUI as an ongoing project, so comments and suggestions are always welcome. Be sure all of this will be written down in the feature requests document. Unfortunately, currently the monitors can't be flipped.Regards,Cristóbal
-
2
-
-
Hi Yoav!
14 hours ago, Yoav Raz said:Do you know if the Tangent Mapper work also on linux with ultima?
I'm afraid the Tangent Mapper is not supported by Mistika Ultima. However, there's a workaround for changing between different mappings. Please, submit a ticket to the support portal and we'll explain it in detail.
Best regards,
Cristóbal -
Hey!
The Mistika default mapping is designed for six element units. I agree with Jan that another Knobs panel is not necessary. However, another Bt unit comes really in handy specially for the use of Printer Lights in the Primary grading. The third Bt unit, mapped for the Presets and History, can be somehow compensated with a proper use of the keyboard, since you can "map" fx presets with the numeric keyboard. If you need to know how, let me know ?
However, as Jan said, all buttons are fully customizable, you can make your own mapping.
There's this thread in the forums in which Jan kindly shared his mapping. Maybe you can share yours if you decide to do your own!
Cheers!
Cristóbal
-
2
-
-
Hi!
On 10/3/2019 at 9:00 PM, mail18 said:I like to 'add Layer' in the 'ColorGrade' interface with a shortcut, but cant find it.
There's no fixed shortcut for the "Add Vector" in the Color Grade node. However, in Mistika, there are multiple features in which you can personalize your own shortcut. I'll proceed to explain how to do it:
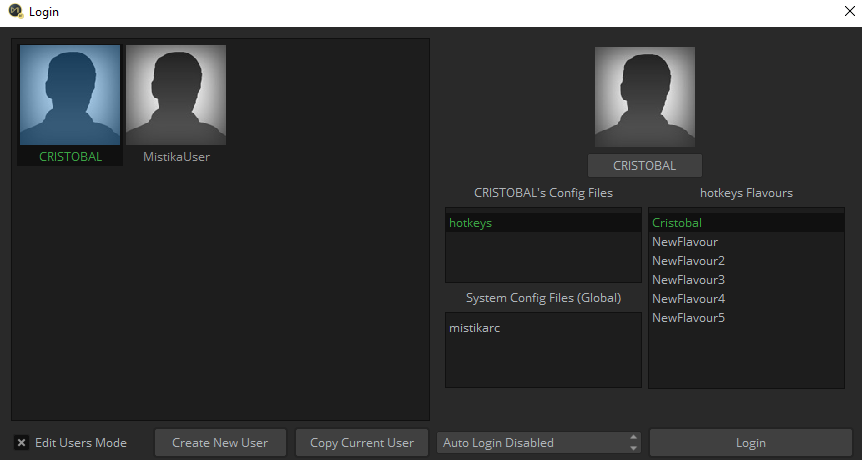
1. Open Mistika Boutique, first, go to the Edit User Mode:
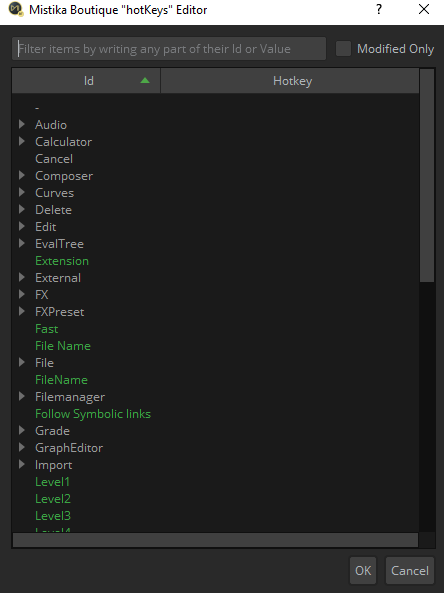
2. Go to "hotkeys", press left click and click on Edit File. That will open the Hotkeys Editor:
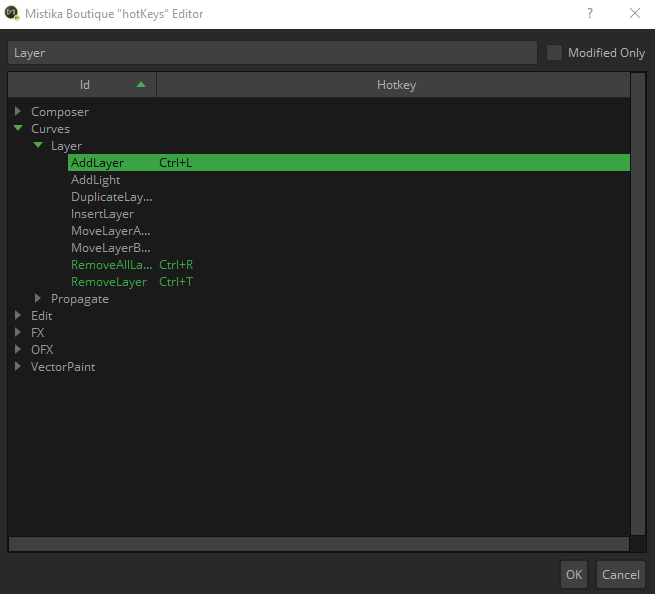
3. Now, in the search bar, type Layer, and navigate to Curves > Layer. Now you will see "Add Layer" as a command without hotkey that can be changed. In the Hoykets tab, there you can make the combination of keys. "Curves" is the name that Mistika employs for describing the manipulations of vectors and layers, since "everything is a curve" in terms of intern technology of Mistika. As you can see in the following screenshot, I have personalized my hotkeys as "Add Layer" with Ctrl + L, "Remove All Layers" as Ctrl+R, and "Remove Layer" as Ctrl+T:
4. Click "Ok", Then, right-click and click on "Save as New Flavour". Flavours is the name that uses Mistika for different hotkeys configurations, so different Mistika users can have different settings in the same system. The flavour will be added in the list, then you can double click on it and activate it. Don't forget to exit the Edit Users Mode before opening Mistika with your Mistika User.
5. Finally, go to the Color Grade node, theses hotkeys will be activated as long as your mouse is focusing in the Vector Tab, that way, if that shortcut is in conflict with other feature, they will not be activated at the same time.
On 10/3/2019 at 9:00 PM, mail18 said:Also I would be nice if after adding a layer with a shortcut that I can name it directly to keep an easy view.
I'm afraid that can't be done. Changing the name of a Vector cannot be done though a shortcut. It's a combination of a movement of mouse which demands the user to make double click to the left click of the mouse, drag the name to erase, type a new one and then press enter.
Let me know if you are able to personalize your own shortcuts. Open a ticket in our support portal in case you find any issues please.
Hope you find it useful!
Cheers,
Cristóbal-
2
-
 1
1
-
-
Hi Jan!
I'm sorry you encountered all these issues.
Let's go part by part:
On 9/30/2019 at 1:55 PM, jan1 said:- The initial attempt to render segments with DNxHD failed with an error message (stating something about the codec didn't support this - more on this later). It worked once I switched to ProRes HQ.
As you said, there must be some configuration that it is not supported by the DNxHD codec. And for sure EDLs are not well handlers of multiple frame rates. We'll be testing this workflow and catching possible issues and report them to the dev team. However, there's also the possibility that Premiere is not properly reading the EDL.
On 9/30/2019 at 1:55 PM, jan1 said:- Segments where the source file didn't have enough material for handles resulted in a freeze frame filling the gap. Which may be ok, but caught me by surprise. Maybe a black frame instead would be better so it doesn't get missed in QC if there's an issue. Freeze frames are harder to spot.
I'm afraid that behavior cannot be changed. It performs the render as if a group that has been enlarged and the sides get freeze-framed.
On 9/30/2019 at 1:55 PM, jan1 said:- The resulting EDL once imported into Premiere links back to the segment clips, but ignores the offset for the handles. Each clip seems to start with the handle, not the in point.
Last week I briefly tested with shots all of 24 fps and could reconform in Premiere. We'll do more testing with clips of multiple frame rates and look for issues.
Cheers,
Cristóbal
-
Hi Jan!
Sorry for the delay in answering.
I think this is the workflow you're asking:
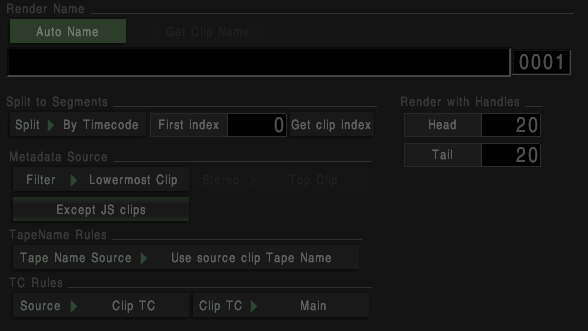
After doing your color grade, you need to render by Timecode, set your handles and let rest as it goes:
Now, in order to make the round trip, the best way will be to make an EDL, in the Export EDL2 tab:
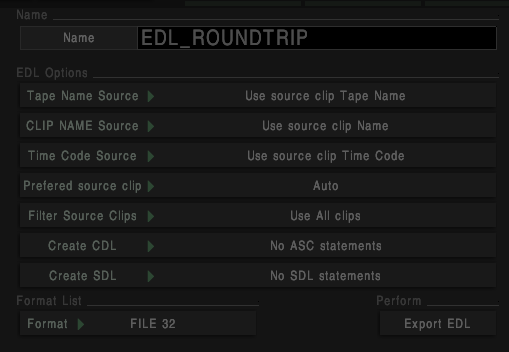
Bear in mind that in Clip Name Source you have to select "Use source clip Name". Now, you'll see when your click on Export EDL that this new Edls refers to the render files Mistika made with the handles. Now, when you go back to Premiere, you can reconform and you'll have your handles.
There's another way to do this:
After you set your render By timecode and handles, you can go to the render settings and in path, select Tape Name. This wil make your render with their source name, although with a final segment index that correspond to the number of the cut inside Mistika: _01,_02 and so on. Now you can create an EDL with this render files.
On 9/29/2019 at 9:24 AM, jan1 said:how can you in Mistika make sure any tracking and keying is extended into the handles? Is there a way to see the clip with handles in the Visual editor while working?
You can be sure that the key will be consistent throughout the whole shot. However, unfortunately, the tracking is not replicate it.
Hope you find all of this information useful!
Cheers,
Cristóbal
-
1
-
-
I actually never thought about that. It's really cool to move the color wheel with the finger. I'll give it a try for sure.
Thanks for the feedback as always.
Cheers,
Cristóbal
-
1
-
-
Great! I'm glad it works now ?
Do not hesitate to contact us with any technical concern. We are more than happy to help.
-
1
-
-
Hi Jan,
Currently, there's no way to perform manipulations of the pen pressure inside Mistika beyond the tablet wacom itself. I'll list if it for sure in the feature request list and we'll document this issue as a warning for possible future users.
Do you find comfortable using Mistika with the finger touch pad in the tablet?
Cheers,
Cristóbal
-
Hi!
Indeed, as you said Jan, one way is to create gangs for the same looking shots, create the grade and then propagate it to all the gangs.
The linearize macro command puts all the clips utilized in an environment in order, according to the original timecode of each clip. It eliminates all fades and wipes, and adds sufficient head and tail time between the clips in order to be recaptured at a later date without pre-roll problems. This macro, in combination with the Match and Paste can be really resourceful.
However, I'd say that if you only want your grade to be propagated to the cuts that belong to the same shot, there's no need to use the linearize effect, just using the Match and Paste effect selecting the "Match Reelname" property will propagate the grade.
First, set a grade to all the effects, and grade the one you know it belongs to te same shot. Then, select the timeline, make Copy, then select the whole timeline again and use the Match and Paste, or use the shortcut Alt + V. Select only Match Reelname and Replace them with pasted effects. In case of Animations, choose the one that fits you the best.
After pasting, you will notice that in top of your timeline you will see different groups created by Mistika with the different possibilities: one with the grades and other without grades, and a mix of them. Choose the one that suits you, in this case, the one with the grades propagated.
Hope you find it useful!
Kindest regards,
Cristóbal-
2
-
-
Hi @jan,
There's no way to select within the vector paint how many frames you want your shapes to be active. The easiest and quickest way to achieve thieve is to propagate the shapes to all frames as usual, then within the timeline use the global razor or the command cut with your mouse, and work with the vector paint only in the cuts you want them to be active.
No apologies needed. We are more than happy to help.
Best regards,
Cristóbal
-
1
-
-
Hi!
There must be some misconfiguration that is not letting Mistika write the playback cache, maybe because it does not have writing permissions.
Please, go to the Mconfig, to the File Paths tab. There, you can check the Playback Cache direction. By default it should be similar to this one: C:/Users/*UserName*/SGO Data/Media/CACHE/PLAYBACK/
Check if the direction you have is okay and if it has writing permissions for Mistika.
In case this does not work, please, submit a ticket to out support portal and we'll deepen more into the issue.
Looking forward to your reply.
Cheers,
Cristóbal-
1
-
-
Hi @jan1.
I'm sorry for the inconveniences caused. I set my Wacom tablet into the firmest value and to make the clone fore tool work well, I had to press really hard. We've never faced this issue. According to the dev team, the values of any tablet are normalized into the software, although it must depend on the quality of the tablet and the different brands. So now we are aware that firm values can cause some issues in the Paint tool. We'll document the warning in our support portal.
Thanks a lot for the report.
Kindest regards.
Cristóbal -
On 8/25/2019 at 7:31 PM, jan1 said:
Import and load the timeline render as a single long clip. Then import the EDL and de-select the 'link to media'. It will create a set of unlinked clips in the timeline, mirroring the edit in the NLE. Now move that EDL import right above the long NLE render and run the 'split conform' macro, then delete the EDL import. Now the original import reflects the original timeline. It doesn't require the use of scene detect, and it can bring over transitions that are EDL compliant.
Such a creative way to use the Split Conform macro and great technique that can save a lot of time! Thanks a lot for sharing!
-
Hi @Rakesh Malik!
On 8/24/2019 at 11:03 AM, Rakesh Malik said:Now to figure out how to use the edge build node to add a little bit of light wrapping, then figure out how to clean up the dark line around the foreground element...
You have a bit more information about the Mistika keyers in the following tutorial. The Edge Build effect is explained from the minute 25th:
On 8/24/2019 at 11:03 AM, Rakesh Malik said:The shape behavior is also very unintuitive. Set the shape's mode to "intersect" and create a shape, it pops back to add, which isn't correct. It makes you think it's broken, when in reality it's just being obnoxious.
Can you explain a bit more about this behavior? I'm trying to reproduce it and I do have that intersect function. I mean, I create first a shape, then, I set "shape combine" to intersect and the result of the alpha is indeed the intersect of the two shapes I have created.
On 8/24/2019 at 11:03 AM, Rakesh Malik said:And if you have, say, the Comp3D node active, select the green screen and add a shape, the shape ends up making no sense whatsoever.
Indeed, the GreenScreen effect is not developed to interact with the shapes. The workflow as usual when working with alphas (combining, dividing, subtracting them and so on) is to export the alpha you have created with your GreenScreen with the Show Alpha effect. Then, in that layer you can create the shapes you want and they will interact. Also, you have the Channels effects in order to do multiple operations regarding alpha or the RGB channels. Finally, the External Key Effect is the one you have to use to introduce a particular alpha in a clip. Or maybe you want to use that Alpha in the Color Grade node, in that case, you have to go to the Output tab inside the Keyer window and set Enable Ext Key > Mask > A.
Hope you find it useful!
Cheers,
Cristóbal-
1
-
-
Hi!
On 8/11/2019 at 12:10 PM, cbator@mac.com said:If I delete the last remaining keyframe, I lose the current value, it resets to the parameter's default. This can be hard to reset to the value I wanted. I consider this a bug.
Sorry if I didn't understand the matter. In order to keep just one particular value when there's an animation, you have to leave that keyframe active. The rest of the keyframes have to be deleted, but one has to remain, because if not, as you said, the whole parameter gets reset.
Let me know if that works for now. If not, please submit a ticket in the support portal so we can see your case in detail and we'll sort out a solution.
Cheers,
Cristóbal
-
On 8/11/2019 at 10:29 PM, Jeff Sousa said:
I'd love for you guys to consider making a tutorial video that goes in depth into all of the memory and core related settings, perhaps showcasing how to optimize a few different systems. Or show some before / after performance.
Thanks a lot for the feedback. We'll list it for future tutorials ?
-
On 8/11/2019 at 6:01 AM, jan1 said:
Does 0 mean Mistika will automatically pick the best value, is 0 the minimal value and will lead to non-optimal performance?
Indeed, that means it's the automatic value for the system to act at the best performance with Mistika.
However, I'll contact SGO agents more aware of Mistika performance that will answer you with more detailed information.
Cheers,
Cristóbal-
1
-
-
Hi!
There are multiple ways to handle animations and keyframes in Mistika Boutique. Every parameter has the ability to be animated with keyframes, and therefore, animations can be controlled, withdrawn or maintained as will with proper operation. I'll explain all of them briefly and then answer your question:
First of all, be aware that the Autokey function:

The Autokey function will make a keyframe everytime each parameter suffers manipulation. Everytime you positioned yourself in the timeline and then you move the values of a parameter, it will positioned a keyframe with interpolation between them. It's important to be aware of the Autokey function, because you can forget easily that it is activated even though is highlighted and make keyframing without the desire to.
Be aware that the four buttons which are left to the Autokey only work for dynamic grades in the Color Correction Effect.
In order to navigate between Keyframes, you can use the Composer Shuttle:
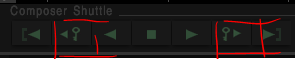
With key Keyframe Left (Shift + Left) and the Keyframe Right (Shift + Right) buttons you can position the cursor in the keyframes easily.
Let's say you have your animation with keyframes, now you can manipulate them in the Edit tab:

- The Undo and Redo, have nothing to do with keyframing, they are for every action made.
- The Insert Point will add a keyframing without animation, that then can be manipulated.
- The Neutral point: Inserts a keyframe in the current frame with the default values of the color corrector. Note: The aim of this command is to remove the values applied to the input or output point of the dynamic correction. To do this, it is only necessary to position it in any previous or later frame in range of the dynamic correction.
- Remove point: Eliminates the keyframe found in the current frame within the range.
- Remove selected: it will delete all the keyframes of the parameter of parameters selected. The same as reset the values by selecting the parameter and clicking on Delete.
Finally, we have the Keyframe Graph, a dedicated tab for working with animation, keyframes, timing and curves:
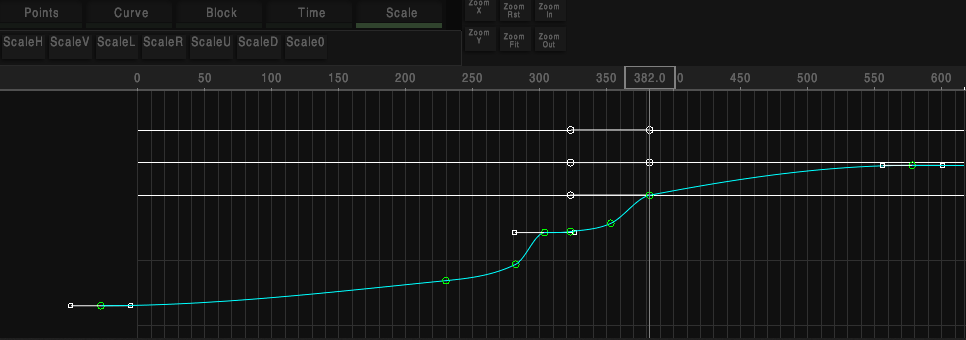
This panel shows and edits the parameter values of any effect clip, Timewarp group or audio clip selected in the Node Graph. All the parameters of clips in Mistika can be animated in time using editable animation curves in the Keyframe Graph area. To set many of Mistika’s effect parameters, manipulators can be used that interactively specify several parameters at the same time. Curves In the Curves area, the curves of the visible exported parameters are viewed and edited. The curves are viewed on a provisional grid, and are composed of different elements, which can be directly edited. A horizontal ruler marked in frames appears in the top margin of the grid, where a vertical guide or dial moves to indicate the current frame. This guide corresponds to the current frame defined by Current Frame, the active frame of the clip and to the Keyframe Slider of the Visual Editor mode. I won't go deep in this tab, cause it deserves its own post, but of course, everything is deeply explained in the manual.
So finally, answering your question:
On 8/10/2019 at 6:22 PM, cbator@mac.com said:Is there a way to make parameters no longer animated and maintain their current value?
I think of two ways to perform this action:
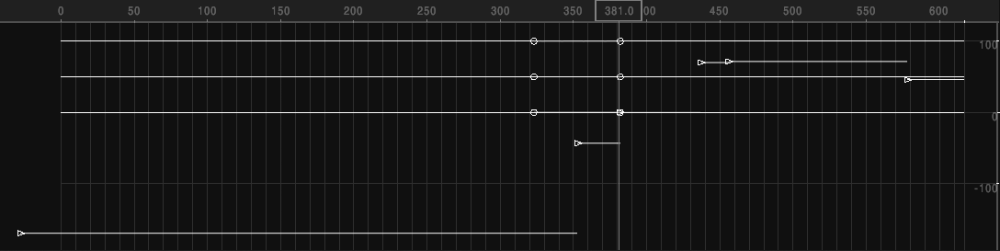
1. If you want only one particular value to exist, you can go navigating between the keyframes. deleting all the keyframes you don't want with the Remove Point button, leaving only the one parameter you want. You can also go to the Keyframe Graph, select several keyframes at a time with a lazo selection with the mouse, and then delete them with the delete button of the keyboard.
2. If you want to act them as constant values, you can go to the Keyframe Graph, and go to Points > Constant. That will leave no transitions between the keyframes, but leaving the parameter untouched:
Does this solve your doubts? Do not hesitate to contact us at any time if you have more technical concerns. We are more than happy to help.
Cheers,
Cristóbal
-
Hi Jeff!
As suggested in the document Recommended configurations for Mistika Boutique 64 GB RAM would be necessary for normal 4K production with few layers. Even more RAM can be necessary for complex multi-layer workflows on workstations with many CPU cores. Indeed, 32GB RAM can be limiting for your performance if you seek to establish a daily workflow with 4k media.
Do you have any more technical concerns?
Cheers,
Cristóbal -
Hi Scott!
Thanks a lot for the report. I'll collect the information given by my colleague to leave it here in case anyone needs it in the future.
In order to make this operation an Immersive or Professional license of Boutique is needed (the evaluation beta version 8.10 includes Stereo Features if you want to test the workflow):
1. First, import the footage and duplicate the node. In every single node set a Framing effect to fit every single eye in separate nodes. You have to build a stack with both eyes and Framing effect. Extract the left eye with a framing effect; the right even with the framing effect. The top node one has to be the left eye.
2. Compose both with the Stereo 3D effect.
3. Set a Vector Paint effect to remove the tripod. The workflows of removing an tripod or rig is explained in this tutorial.
Hope you find it useful!
Cheers,
Cristóbal -
Hi Blake!
In this Article: What if my camera rig model does not appear in the camera presets list? you'll find several following procedures that explain what to do in your situation. However, if you would like to, SGO's agents can create you a preset for you if you submit a ticket in the SGO's support portal. You will need to provide sample images, ideally recorded in a place with nothing too close to the camera (a clear in a park, a parking lot, a town square... ).
First, try to obtain a suitable scene for the calibration:
- Nothing and nobody close to the camera, at least 3 meters
- A street with buildings and trees, squares, parking lots
- Large halls, like sports venues, with a structured ceiling, with a camera in the open
- Public garage with no cars or columns at less than 3 meters
If a calibration shot cannot be obtained, choose the shot most fitting the above.
Optional, especially convenient for cameras with little overlap: Ask for a static scene, and two shots, second with the rig rotated half its camera spacing: Means if they are 4 cameras at the horizon at 90 degrees, rotate the rig 45 degrees. This provides an apparent doubling of a number of cameras and produces better lens distortion detection.
Notice that if a camera allows setting the image ratio at different values, like GoPro that can record both 4:3 and 16:9, settings for both resolutions may be needed. Recording a larger image is always better but some customers used 16:9 ratio apparently.Looking forward to your reply.
Cheers,
Cristóbal


Bug Mistika Boutique 8.10
in Releases
Hi!
A priori, I think the issue is caused by the fact that the right screen is not lined on the bottom to the screen on the left. Would you please try to lined them as in this screenshot?
If that does not work either, could you please open a ticket in our support portal so we can take a deeper look on this case? Thanks a lot in advance.
PD: I love your work set up!
Cheers,
Cristóbal