
Posts posted by Cristobal Bolaños
-
-
Hi! ?
I think, that instead of copyng and pasting the settings, you need to use the "Merge from select" tool, which will combine all those separate sequences into one. Here's how it works:Mass import: Drag & drop the main folder containing all the media files and as many subfolders as needed, and the material will be organized automatically into clips. Also an import dialog will open where you can optionally specify the camera preset for your camera rig, and it will be applied automatically to each shot.
Multipart import: During mass import, incoming clips that were split into multiple parts (typically due to file size limits of the SSD cards) will be automatically placed as consecutive stacks (this works for most filenaming structures ). Then:
1) when importing the folder MistikaVR will ask for the "number of cameras". Set this value to the number of cameras in your camera rig. In that way, MistikaVR will know that each group of this number of files belong to a same shot and it will be able to distinguish different segments.
2) After the import of multi-segment shots, you can reassemble a shot by clicking on its first segment, then right-clicking on its last segment and use the "merge from selected" option. That will combine the multiple segments into one only clip.
Still-image panorama: When importing an enumerated sequence, the user can choose either if the images are a time sequence or if each file is a separate camera view.
Here it is a tutorial using the above tools:
-
 2
2
-
-
On 3/21/2020 at 6:51 PM, jeff@dungeonbeach.com said:
Speaking of workflow, I do think it's a little more logical to first deal with "pre-sat" on the primaries and "post-sat" as a secondary (in bands), but that's just how I work as a colorist. I understand you need to have "Post-sat" on the Primaries page for CDL compliance, so we're kind of stuck the way it is. It's fine.
The thing is, while the Post-sat (as the name suggests) applies the saturation after the whole process of the primaries, the Sat of the bands work in parallel. Therefore, the post-sat will affect the overwall contrast while the sat in the bands will not affect the luminance, due to the luminance discrimination of the signal in the bands tools.
On 3/21/2020 at 7:09 PM, jeff@dungeonbeach.com said:Thank you for thinking of these solutions. I see that neither is too ideal. Hmmm. I personally don't control the Curves with a panel but I do know some users are passionate about being able to do that, so best not to alienate them.
Indeed, it will be a big loss, however I don't know how many users control the curves from the tangent, rather than from the mouse.
On 3/21/2020 at 7:09 PM, jeff@dungeonbeach.com said:Do you have any relationship with the manufacturers of Tangent? Can you possible poke them about adding "Caps-lock" style functionality to the Tangent Mapper software, as an option? Let them know it's important to your customers? I imagine since SGO is selling the Elements as the panel of choice for Ultima (6 panels, no less!), maybe Tangent can help us out here. Because the mapping is pretty good otherwise.
Yes, we have a good relationship. We can give them feedback about the tangent, however, I assume it will be taken as regular feedback. Seeing this from their point of view, I guess it's like when you are mapping, there's no one solution for all the softwares.
Now that you say, we are working on a 4 units mapping for the elements, let me know if you are interested, and you want to give it a try! ?
Cheers,
Cristóbal
-
-
Hi everyone,
So, following your feedback, we've come to the solution that the "Alternative" function is not a great tool for the Wave2 tangent mapping, because it makes it a bit cumbersome to work, specially if you work with a Pen tablet. So, the Alt button should work as a toggle between the different banks, in other words, as the "Next Trackerball Bank", as if it were the "B" button of the Element tangent.
However, there's a major problem, since we cannot create different banks for the Color Wheels, we won't be able to to use the "Alternative button" to access the Soft Clip color wheel in the Primaries tab, and the Blacks and White color wheels in the Bands tab. There are two possible solutions that I can think off:
Solution 1:
- Leave the "ALT" button for the Alternative function, because it is easy to identify for possible future users.
- Find another button to work as the "Next Trackerball Bank". Probably one of the navigation buttons.
Pros: We have both the "Alt" and the "Next bank" buttons.
Cons: We may have to lose one of the navigation button. Maybe, the curves (since curves probably will need the action of the mouse/pen one way or another)?Solution 2:
- Use the "ALT" button for the "Next Trackerball Bank"".
- To access the Soft Clip color wheel of the Primarias, and the Black and White color wheel of the Bands, create new modes for the Primaries and Bands respectively, that contains those color wheel tools that we may have lost.
Pros: We always use the "ALT" as a toggle.
Cons: It can be a bit messy to have two different Primaries and Bands tab.What do you think it would be the best solution?
Looking forward to your replies!
Cheers,
Cristóbal
-
@jeff@dungeonbeach.com, regarding your last matter regarding the possibility of having the Printer Lights on the Bands, or the Post Sat function on the Bands tab as well, I think there's on caveat.
Mistika's Color Toosls are organised on a way that helps you with a natural workflow during your creative work: first the primaries, the bands for secondary color grading and so on. Of course, this is variable, and Mistika freedom lets you define whichever workflow you are more pleased with.
However, I think there's a problem if we'd map function in the Bands that belong to the Primaries (and viceversa). That can be hazardous, because you lose track of what's been changed. I reckon you need to see how much you're changing the value at the same time you're watching the image.
It's impossible to have "one tangent mapping to rule them all", in other words, a solution for an user could be a problem for another, that's precisely why there's the possibility to custom mapping. Let us kwow if you happen to find any trouble when doing your own mapping, we'll happily help?
What do you think behalf this?
Cheers,
Cristóbal
-
1
-
-
On 3/13/2020 at 6:00 PM, jeff@dungeonbeach.com said:
Are there keyboard shortcuts for the presets (and histories)?
Yes, they are pretty simple to use!
They FX Presets shorcuts are the following:
FX Presets
Create T
Maximixe Control+PageUp
Def Control+KeyboardNumber
DefTemp Alt+KeyboardNumber
OnTop Control+Alt+KeyboardNumber
Use Keyobard NUmber Assigned
Maximixe Control+PageUp
The thing is, you define a number for the FX presets with Control+KeyBoardNumber, let's say 1. You'll see the number as an overlay in the FX presets tab:
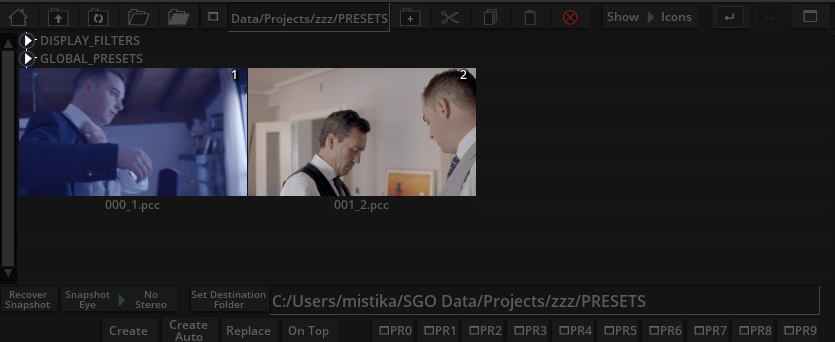
Then, when you play 1, or 2, the preset will be applied on the Shot you are positioned. This is they way it also works for the buttons in the Wave2 ?
The history keyboard shortcuts are the following:
Histories
Create Enter
Previous Control+Down
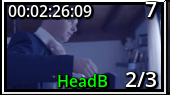
Next Control+UpYou'll see in the StoryBoard an overlay of the number and current history.
By the way, @jan1 created this Forum Post, compiling some of the key ones for reference in a Google Sheet:
-
1
-
-
Hi Jeff!
Thanks a lot for the kind words. We are safe and sound ?
Yes, I understand your client's concerns. However, I'm afraid that, as you say, currently in Mistika Boutique there's no streaming function available.
The shortcut for Full Screen is Control+PageUp. If you are more comfortable with other shortcut, you can change it, if you go to the Edit Users Mode, and open the hotkeys Editor, you need to seek for the Monitor > Record > Window > Maximize, parameter. There you can edit it!

However, take into account that Shortcuts in Mistika work depending on the tab in which the focus is set. Let me explain this through, please. Mistika is huge, and there are different shortcuts for different parts of the interface. You have shortcuts for the Visual Editor, the Timeline, the effects tab, and the record monitor. So, if you want to use the shortcuts of that area, you need to place the mouse, which set the focus on top of it. In conclusion, to maximize the Record Monitor, you need to first set the mouse on top of it, and then use the shortcut.
I know this can be a bit cumbersome, that's why I suggest, if you have the possibility, to use Two Screens for your remote session. That way, you can use TeamViewer or Anydesk software, and your client will be able to see both screens at the same time.
I hope you find this information useful.
Cheers,
Cristóbal
-
On 3/12/2020 at 9:44 AM, jeff@dungeonbeach.com said:
What's the correct stack order? Does the shaderFX go before or after the Unicolor? Before the ODT? Before the Unicolor? After the ODT?
I've seen two possible orders:
- The First one is to place the GLSL right after the Unicolor in which you transform the signal from the source to Linear Acescc v0. I personallly recommend this one.
- The second one is that you place the GLSL on top of your stacks, fixing the issue as the final effect.
Let me know which one do you find the best ?
Cheers,
Cristóbal
-
As I said in the previous post, I have created a Mapping that contains the Printer Lights mapped on the F buttons when you are working in the Primaries tab. You can find it attached in this post ?
Let me know if you like the mapping more that way.
Cheers,Cristóbal
-
2
-
-
On 3/12/2020 at 5:30 AM, jeff@dungeonbeach.com said:
Is it possibly to get the alt button to behave more like caps lock? Tangent limitation? It's actually not so ergonomic to press and hold the alt key and press another button on the panel. Especially when holding a stylus, it becomes a big operation. I really wish alt was a toggle.
Yes, it is indeed possible. However, I'm afraid that the Wave2 has some limitations. Let me explain this trough, please.
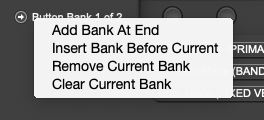
You can create a different bank on the Tangent Mappers, by left clicking on the caption and then selecting "Add Bank At End". As in this screenshot:
Then, if you want to move between the different bank, you need to use a button to put the "Next Trackellball bank" functionality. I guess that the best button for this would be the "ALT" one:
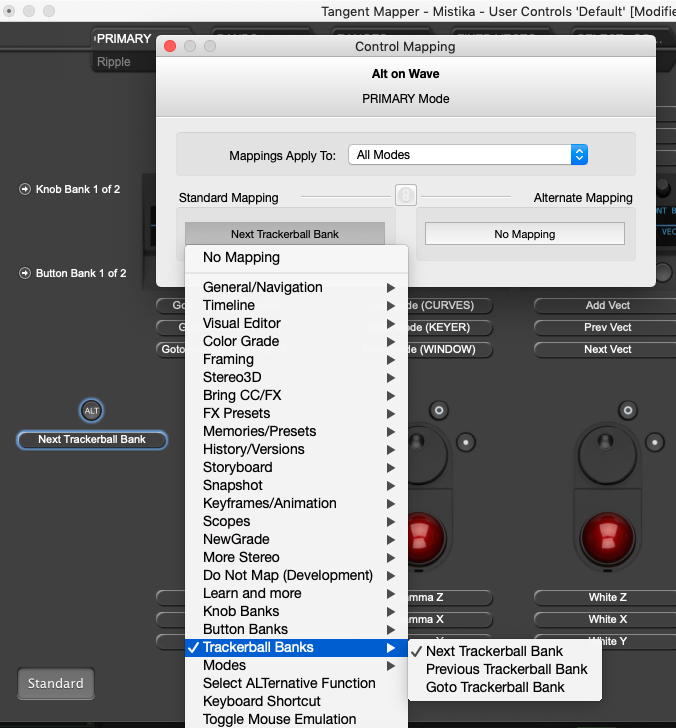
Now, whenever you click on Alt, it will navigate to the next bank, acting soft of as a Cap button in the keyboard. As you suggested.
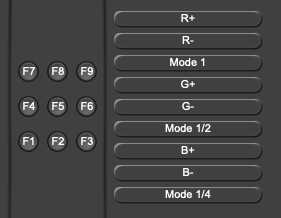
However, and this is when the limitation comes, in Wave2 you can only create different banks for the Buttons and Knobs of the upper side of the Tangent. As you can see in the following screenshot, I have created another bank for them, so they look empty:
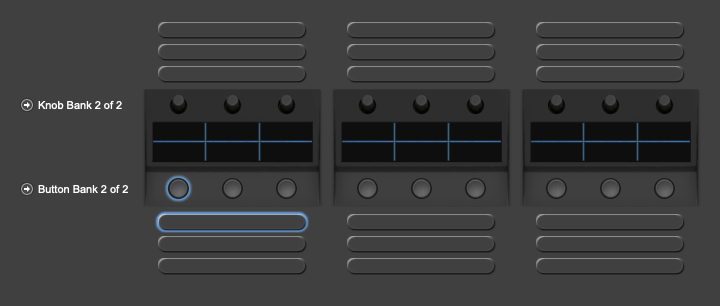
You can see in the right part of the Wave, where the Histories, Presets and and the Shuttle functionalities are mapped, you cannot create different banks, as well as in the Color Wheels.
Probably, to sort out this inconvenience, it is as simple as mapping the Printer Lights in the F buttons when you are working on the Primaries Tab. And leave if for the FXPresets when you are working on the rest of the color tabs (bands, curves...etc). What do you guys think about that? ?
Regarding the fact that the "Alt" does not work as a toggle, rather than a modificator of the functions while you are pressing it:
I'm afraid , when I was designing this mapping, I wasn't ware of that capability of the Tangent Mapper of creating additional banks, until I did some research and discover it. Besides, unfortunately, there's not "B" button as you can fin in the Element tangents. That's why I used the "ALT" button for the Alternative buttons. That indeed, as you say, can be a bit more cumbersome to work, specially if you are at the same time working with the Pen Tablet. Probably it's for the best that we change the mapping, and we leave it the same, although instead of Alternative function, we use that button to native to the "Next button bank. Do you guys think this is best for the Wave2 mapping?
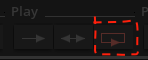
On 3/12/2020 at 5:30 AM, jeff@dungeonbeach.com said:Also, is it possible to make the play button stay in the loop of a particular shot in the visual editor? One thing that bugs me is when I'm working on a particular shot, I grade it, was to see how it plays, and the playhead goes to the next shot on the timeline even though I intend to loop the shot I've been working on.
Yes, you can press the "Loop" button to do so, which is in the Visual Editor. Then, whenever you put some Playmarks (shortcut: W) on a shot or group of shots, it will be looped.
I hope you find all this information useful!Cheers,
Cristóbal
-
2
-
-
On 3/5/2020 at 3:52 PM, Rakesh Malik said:
Scratch and Mistika both work well with the Tangent panel, and I've always thought that Scratch's mapping was quite good... until I got it working with Mistika. Now the Scratch mapping, as deep as it is, feels a lot less elegant ?
It makes me so happy when I see hard work has rewards for Mistika users ???
-
1
-
-
Hi Jan!
Sorry for the late reply. I've been digging into this matter. Indeed, it does not have a simple solution, although some situation when working with ACES the ranges can be of well use.
I've talked to some colorists, and the overall conclusion is that when working with ACES there's no much of a use of the Bands tab, specially when tryng to make a difference between the highlights and whites, due to the ACES curve, in which the white point is too low
On 2/29/2020 at 2:55 PM, jan1 said:While ACES has a lot of great advantages, it does make it hard for some of the current tools to work with it. I do see a lot of people work in scene referred work by simply unifying on the Arri LogC color space instead. Maybe that's a better way to go for now.
Indeed, a lot of people is more familiarized with the Arri LogC color space. That's when the Unicolor gets really handy, when you get used to the modificaciones of one particualr signal, and you can easily turn all your media into that color space or curve.
-
1
-
-
Hi Jaaron!
Sorry for the late reply.Many thanks for reaching out and thank you for using Mistika Workflows, which is much appreciated. First, we'd like to thank you for your request and for your contribution to make Mistika even better every day.
We will save your request and will consider it for discussion when our next R&D meeting takes place.
If you have any additional questions, please do not hesitate to reach out.
Thank you very much again and have a great day.
Kind regards,
Cristóbal -
Thanks a lot for reaching out!
That question has also asked on a webinar. I suggest you check it out all the webinar because it's so thorough. The question you're looking for is answered from the minute 1:03:00.
Basically, the Vector Paint will also work on the Stereo view. Although there can be some artifacts caused to the mismatching of the deep channel, but that can be sorted out as well.
I hope it helps.
Cheers,
Cristóbal-
1
-
-
Hi Jan!
I'm sorry for the late reply. I seem to have problems with the mail alarm for the forum posts.
My bad. Indeed, the white pivot is on the Primaries. If you want a general pivot to act on all the tools, that's what the ranges are for.
So, try lowering the ranges accordingly to around a 70% for ACES.
-
Hi guys!
Sorry for the late reply.
On 2/27/2020 at 2:45 AM, Rakesh Malik said:Apparently, I have to reboot the machine between Mistika sessions... sigh.
How come? Have you tried to simply reboot the Wave2 by unpluggin and pluggin the device again? Let me know a bit more about this please!
On 2/28/2020 at 4:58 AM, jeff@dungeonbeach.com said:I also like the Wave2 mapping. It's very simple. But lots of buttons are unused, no? F1-F9. Up and down arrows for banks. Seems like there's opportunity to improve.
Thanks! Wave2 is actually a really cool tangent product. It totally fills the gap between the Arc and the Elements.
Actually, there is a use for those buttons. Maybe it wasn't mapped when this post was created, but it is with the current built in mapping:

The F buttons are mapped for the presets. This is how they work:
- Once you have different FX Presets created, you can assign them a specific number by pressing the button with the Alternative button also pressed.
- Now they have a number assigned, whenever you are on a Color Grade node and click on the F number button, the color grade will be replaced with the FX preset.
This tool is really quick and is great for matching shots, and also for tryng out different look. Although for the latter, it is bes to use the histories.
The Up and Down buttons are mapped for the historys:
- The Bring Newer moves to the next hsitory, and has the alternative function of Creating a Version.
- The Bring Older moves to the previos history, and has the alternative function of Deleting a Version.
That way you can both easily navigate trough your historys, create them and delete them with only two buttons.
If you ever have any doubts, you can go to the Tangent mapping software and it will be easier to see the specific function of the buttons. Also, don't forget that is fully customizable ?
Cheers,
Cristóbal
-
On 2/25/2020 at 9:05 PM, jan1 said:
Is there a fix for that or a way to have the bands react properly? If I replace the ACES Unicolor and ODT with just a camera LUT everything works as expected.
Indeed. ACES has the white point very low. To make it work right, try lowering the white pivot to around 70%. That way you will compress a bit the ranges and get a result more reliable from the perspective of a log rec709 color grading. Actually, this is an issue that comes from the ACES curve.
-
1
-
-
Hi Rakesh!
What version are you working on?
There have been a couple versions since the mapping of the Wave2 was already built-in in the software, so there's no need currently to add extra file settings for making the mapping work.
The following procedure should be:
- Install the Tangent Driver for your OS
- Go to the Mconfig and salect in the Tangent tab the one you are using. Save and exit.
- Start Mistika Boutique.
If this does not work, please check the following document: How to set up Tangent Color Panels for Boutique
Besides, if you would like to open a Support Ticket, we can have a Team Viewer session and fix it.
Let me know your thoughts, please.
Bests regards,
Cristóbal -
Hey Jan!
I found a really cool shortcut that may be of well use. I already added it to the sheet.
If you press "T", you will create a Preset. It is not the "Create Auto" function, which will create automatically a preset without the possibility of writing a name for it. I recall you lack this option in the Tangent Mapping software. You can now add it by selecting a keyboard shorcut for a button. However, as all shortcuts in Mistika, the use of this depends on the focus of the mouse. So, to use it, the focus of the mouse has to be on top of the fx preset menu.
I hope it helps! ?
Cheers,
Cristóbal
-
2
-
-
Hey Dale!
Thanks a lot for posting this question in the forums. That way in future users have the same issue will have the possibility to look in here ?
I answered you already in the support ticket. I'll paste the answer:
That's a really cool question, and that's what preset are made for! Presets will inhertid all the metadata in that stitching, from optical flow values to keyframe animations. To do so, simply left click on the Clip Stack and click on Save Preset, as in this screenshot:
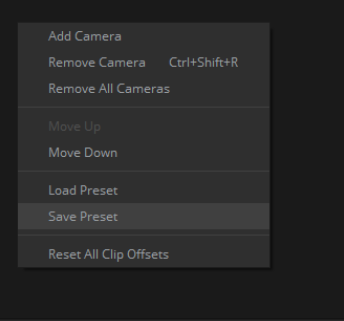
That will save a grp file in the Preset folder, which then you can drag and drop into the Visual Editor of your new media.
Please, let me know if you need further assistance.Cheers,
Cristóbal-
2
-
-
Hi Peter!
Thanks a lot for reaching out.
Did you do the steps of the following procedure to stitch Kandao Qoocam 8k video footage explained in the manual (chapter 7.8.4.1)?
For this specific preset, there's no actual need to use the Kandao calibration, in the case the stitching works rights in the first place. It defers on the shot. Have you tried the Improves tools instead of the Kandao calibration?
Looking forward to your answer.
Cheers,
Cristóbal -
Hi everyone!We've contacted Paul Dore to ask for permission so we can adapt his GLSL code to Mistika's. Now, with the GLSL file attached in this file, you can easily fix the Blue Highlight Artefact when moving from AP0 Gamut to Ap1 Gamut.
Here you can see the before/after:


Thanks and kudos to Paul Dore for this awesome code. Much appreciated.
I hope you find it useful!
Cheers,
Cristóbal
-
2
-
-
On 6/3/2019 at 10:53 AM, jan1 said:
I was thinking it may have a second one, like the 'B' button that goes to the next bank on the Elements.
Hi Jan,
I was looking into the Tangent mapping documentation for more information and updates. I realised there's a way to add a second button bank. The solution was in plain sight.
You just need to left click on top of the "Knob bank 1 of 1" caption, then a contextual menu appears with the following options:
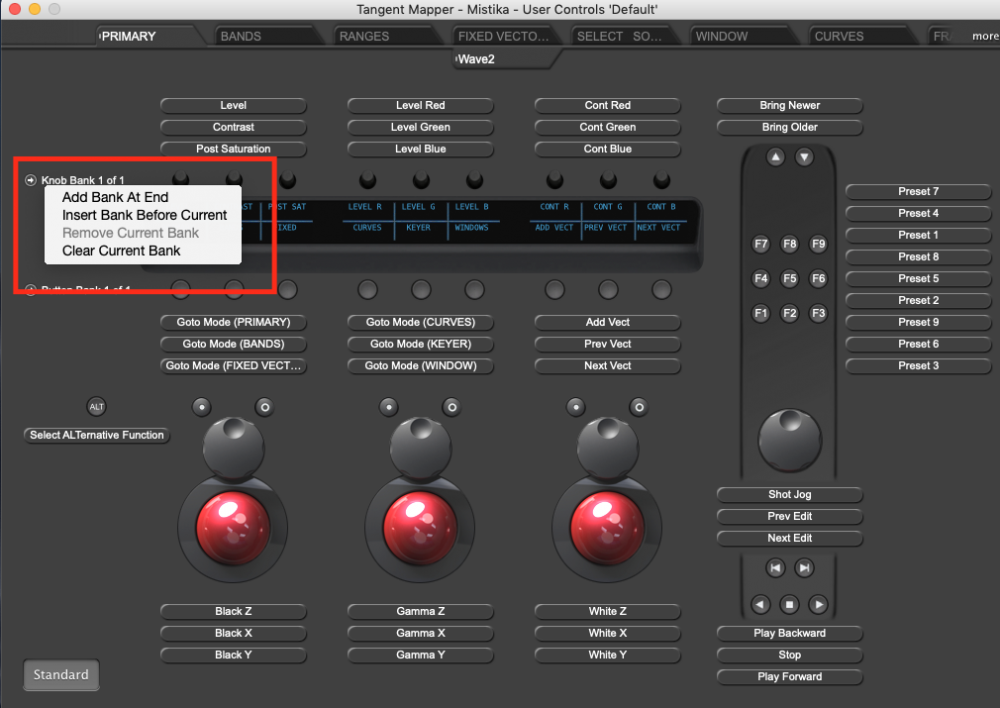
- Add Bank At End
- Insert Bank Before Current
- Remove Current Bank (can't click if there's only one bank)
- Clear Current BankThen, another button has to be used for navigating between the banks.
This makes things even more interesting. Actually I think this way is better for mapping than the Alt, since the Alternative function demands the user to stay pressing the button while using this mode.
I hope you find this useful ?
Cheers,
Cristóbal
-
1
-
-
I'm afraid there's no such tool. Actually, a similar tool has already been requested!
The tools for quickly navigating through the different layesr are the "Prev Vector" and the "Next Vector" buttons avaiable in your Tangent devices.
-
1
-

Tangent Wave 2 Support and Tangent remap options
in Releases
Jeff, that's awesome!
Thanks a lot ?
I think that sorts out the issues we were discussing right?
I'll redesign the mapping taking into account this new tangent mapper asap, and share it with you!