
jan1
Members
-
Joined
-
Last visited
Everything posted by jan1
-
Related question - what happens when you open a project with a different conflg? I've seen the warning message that tells me this project was originally 5K and now you're at UHD. Would it work to keep one project, but just open it with different configs as output requires?
-
I have a project that has a mix of footage with 5K, UHD, and HD resolution. This is not about making a single timeline and rendering, as in a finished edit. I know how that works with framing nodes. I'm only using Mistika for a beauty grade. Each clip has to be rendered out in it's original resolution to be re-conformed in Premiere for the final assembly. So the 5K clips need to be rendered in 5K, the UHD clips in UHD, and HD clips in HD. Ideally without any intermediary scaling to maintain best quality. At the moment I setup three different projects with different configs. But that's a lot of overhead switching back and forth, and matching grades between projects. I know in the output section I can select the resolution. I also know that Display filters can be set for render. So I'm wondering - is there a way where I can leave the project in 5K config, but then for the UHD clip, setup a display filter that frames it for UHD at render time, and then set the output resolution to UHD. Will that work, and would it avoid any scaling? I know, odd ball scenario.
-
It's in the timespace menu (all the way on the right bottom below the 'Exit Mistika' button). A button called 'Save Image' which will save the current frame as a .dpx file.
-
Ah perfect. I do think you have some things remapped though.... This sequence didn't work for me, but going back to the master classes, I found a reference to it, and it seems to be Control and right click by default.
-
Is there an easy way to read the color of a pixel. I'm using some of the BorisFX OFX plugins and the pixel chooser requires entry of a color value. It has the tree separate RGB values, but no automated color picker like other OFX UIs offer. So I have to determine the RGB values. I've had success putting a color grade node on top of OFX, using the 'Set Color' tab in the visual editor, going to 'Pick Color'. That reads out the RGB hex values. The OFX plugin however needs the float RGB values, so I have to use a calculate to convert hex to float. Workable, but hoping there's a faster way.
-
OK, worked it out. Apologies for creating noise in the forum. Maybe it helps someone else down the road. The easier solution is to create one vector in the color node for the shape. Then in a second vector do the HSL key and color correct. Enable the External Vector and select the previous vector with the 'Add' operation. That combines the inside shape with the HSL key. And it's all contained inside the color node, just spread across two vectors. But that's manageable in terms of timeline propagation.
-
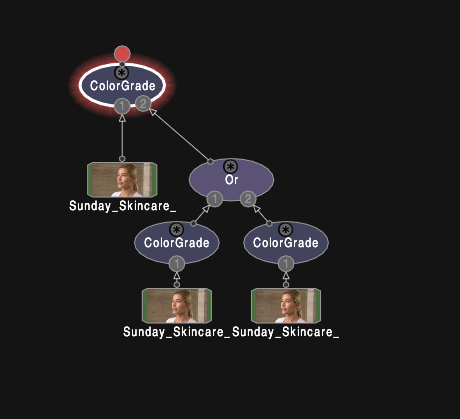
If memory serves me right from school many years ago, An 'OR' can be simulated by a 'NOT(NOT(A) AND NOT(B)), and while I can invert the shape, and I can take the outside, I'm missing the outer NOT to make this happen....
-
I ran into an issue yesterday, and none of the operators seemed to do what I needed. Here's the scenario: I'm keying a person in front of a textured background. The skin and background are very similar, so the key has to be just right. On the very edge of the frame the exposure dropped and there was some key noise. So what I was hoping is to combine a key and a shape in an 'OR' operation. The key would catch 99% of the background, and I would override the key on the frame edge with a shape. However, I needed the shape to include that area, not eliminate it. Kind of an inverse garbage matte. I've run into that scenario several times when I have super tight keys, where I can gain some wiggle room by overriding a noisy area. I tried various combinations of inverting the shapes, outside mode in the keyer, and looking at both inside/outside grades in highlight mode. No luck, I think the limitation is that all the variations of outside mode are always 'AND' operations, never 'OR' operations. I was able to create a complex node tree - using separate color corrector nodes for the HSL and shape, then an channel operation or, and finally the actual color corrector that imports an external key. That's a lot of tree building as I have about 20 clips in the timeline of the same shot that all need this. And with this node tree I'm duplicating the initial color/uni color 3 times, so if I need to make revisions I need to do that 3 times, unless I build the link node in. Also, there are so many keyer nodes, but no HSL standalone. You have to use the color node and export. Same for just a simple alpha shape. Granted in the end it's kind of the same thing.... Any ideas on how to do this easier?
-
I think this is a known limitation and the dev team has it on their list. I don't think there is any short-term work around. Jan
-
I'm assuming, though I don't know for certain, that Unicolor does not use any LUTs internally, but instead the proper color space primaries and transforms. That is always preferable over the interpolation of a LUT. So to the extend possible I would always use Unicolor rather than a LUT, at least when it comes to the basic transforms for scene and display referred grades. Then use LUTs for any creative elements only.
-
It's tricky business. Technically speaking all GUI monitors are 2.2, not 2.4. TV and reference monitors are 2.4. Which often leads to the mismatch when people grade and then watch things on a GUI monitor. Of course, with the right software (or OS setting) you can also change your GUI monitor to 2.4, just to make it messier ? That being said, most browser based viewers like Vimeo/YT expect videos to be in 2.4 and the monitor in 2.2 and should apply the appropriate conversion. However, ever since browsers started using hardware acceleration for video playback most browsers have had heaps of bugs and are all over the place on this matter. That said, I generally deliver online video content in 2.4, rather than guessing what their viewing environment is. Doing the conversion on your end to 2.2 is likely making matters worse, not better.
-
That's an interesting point. In Unicolor there are two choices - 'Gamma 2.4 - ITU BT1886' and 'ITU BT 709/ITU BT 2020'. There's no other setting that includes '709' I had been using ITU BT 709 which seemed logical based on the naming. When I just tried them both, there's quite a bit of a difference. In my example I'm going from Arri Log C / Arri Wide Gamut to a Rec 709 calibrated reference monitor. What would be the appropriate output gamut/curve? So far I've been using 'Rec 709 D65' and 'ITU BT 709/ITU BT 2020'.
-
Thanks Adrian for this thoughtful reply. I quite like this trick with links. That seems very easy to do and easy to copy back and forth without making for a really messy timeline. I will give this a try on the next project.
-
Not sure what the right answer is. But I have found the Unicolor node to yield sometimes surprising results. It seems straightforward and I would have configured it the same way you did. That said, I was just working on a commercial job shot on Arri, and when I apply the Arri Gamut/Log to the footage, which is definitely log material, the results are over exposed and I have to bring it back into range. I wasn't on set, so I can't guarantee that it was shot correctly, but I would assume yes. So there seem to be cases where I'm not sure I can 100% trust the Unicolor transforms. You could create a LUT in LUTCalc or your favorite tool and load it via the LUT3D node instead and see if this is any better.
-
So a regular scenario I encounter while working on grades for commercial / digital content for an agency: Step 1: You grade a few select clips for review of color direction. Step 2: Client provides feedback, additional changes are made, this repeats a few times Step 3: Client decides that they liked the 2nd version more than 3 or 4 after all. Step 4: Everything gets graded with the 2nd version of color How do you manage all these different grading versions so you can easily go back to a previous version and apply it, or use it as the base for a new version? In Resolve I would duplicate the entire timeline and save it as Revision X. Also, on every clip as I change grades, I would create a new version and label it as Revision X. So I have the older complete timelines as backups. But within any given timeline, I have every grade version for every clip, I can easily load it to revert to it or then make further changes. In Mistika so far I have been of course saving the entire timeline via 'Save As' Revision X. So at least I have a record of what was there at a certain point. But there isn't an easy way within a timeline to label/preserve version. So to some extent I have been adding new color nodes for each revision, and locking old ones. But that means the stacks are getting a bit unwieldy. I guess I can also create presets of various grades, but that's labor intensive, and a preset only addresses one node, not an entire stack. Or I could load the previous timeline, find the clip, copy the entire stack, then load the current timeline and paste it. Does copy/past work between timelines? Or instead of duplicating the timeline, simply create a copy of it above the original in the timespace, and hiding/disabling the previous one underneath. Makes for a messy timespace though after a few revisions. Maybe collapse the previous grades into a group to keep things manageable. Keeping in mind that any project may have 30-50 clips which between them may have 10 variations/scenes that share a grade. So this has to be scalable in some way. I assume this is not a new problem. How are those of you who have been using Mistika for a long time on commercial projects been doing this? What's the best practice?
-
Right, but it also opens the visual editor (when you're in single monitor configuration). I was thinking of getting the playhead right where the cursor is, but staying timespace on single monitor configurations. I think this is one of the teething issues where a lot of the UI was built with the assumption everyone uses two monitors....
-
I must be missing something obvious, but can't find it in the manual or the tutorials. Is there a way to place the playhead at the mouse cursor? I see a large variety of shuttle commands to place the playhead, as well as setting playhead at specific TC. But when I click with the cursor it sets a cursor at the location, doesn't move the playhead. And any variation of Cmd/Shift/Opt doesn't seem to work either. Thanks, Jan
-
I'll add one more, maybe simpler fix for the story board. I'm just working on a commercial that was shot with three different cameras. There's a lot of copying back and forth in the storyboard between individual cameras. I thought to make things simpler, I would sort the clips from different cameras on separate tracks and then hide tracks selectively to filter the story board so I would only see clips from one camera at time. It works partially, the hidden tracks all show up as black thumbnails, so at least I can ignore them. But it doesn't condense the story board, I still have to skip all the black clips. So it would be nice if the storyboard could ignore disabled or hidden clips as one easy way of filtering.
-
An even better feature would if this was dynamic, but that is more complicated: - 2 UI Monitor setup - When no clip is selected (visual editor inactive), the time space is on the left, making it easy to work on the timeline for conforms, renders, etc. - As soon as a clip is activated in the visual editor, the time space moves to the right and visual editor opens on the left. That would keep the most critical work on the monitor in front of you, but give you quick access on the secondary monitor to add an effect to a stack without switching.
-
Is there any hack (or future feature) to flip the time space/visual editor arrangement? For the most part I use Mistika in single monitor mode, since I have my primary monitor centered and the second one at an angle to the side. That's impractical with the visual editor being on the secondary display. Luckily the switch between time space and visual editor is pretty fast, so going back and forth is not too bad, and if you setup your stacks right you don't have to switch too often. But there are times where it would be nice to work with both monitors. But I would need the visual editor on the left and time space on the right. An additional checkbox in mConfig could take care of that.... And no, swapping primary display assignment is not a good answer, as it needs to stay the way its for all the other things I do, unless I change that every time I launch Mistika. I already have to turn the menu bar on/off. I'd rather not have yet another system setting.
-
Here's my current mapping for a 6-piece Tangent setup. AllKlier R2.xml
-
My layout keeps evolving... I can post an updated version. Most of recent changes have to do with cleaning up the Mf buttons relative to the Storyboard and Snapshots and navigating more efficiently.
-
Yes, I'm using the default Mistika setup with 6 parts: BT-KB-BT-TK-MF-BT It's definitely worth to have at least 1 extra BT panel so you have access to vectors and details. The 2nd extra BT is for history/versions. If you don't need that you could skip that - or you could use it for other functions if you remap everything. It's really easy to change your mapping now. You don't even have to quit Mistika. Just open Tangent Mapper and change things around to your heart's content.
-
SGO would have to confirm, but I believe 6 is the max at the moment. Mostly based that mConfig only has 6 fields to enter serial numbers into it. I assume this could be changed, and the Tangent Mapper certainly could handle additional knobs. That said, I would think first about what you want to assign those knobs? I've been customizing my layout significantly and don't think I'm terribly short on knobs.
-
Very cool. Didn't know about those hotkeys. That should be a YT tutorial, as it could definitely help.

