
Posts posted by Rocio Del Pino
-
-
Hi Jeff,
Many thanks for your feedback! It's much appreciated. We already are working on the fix for h264& h265. It seems ProRes is involved. As soon as we post a new version with the fix, we will send an email notification for all the users. I'll try to get info about the frame.io questions and back here asap!
Best Regards
.ro
-
-
Welcome to everybody ?
As you might know, we already have posted the first Open Beta of Mistika Workflows. I would like to invite you share in this forum all the issues you find in the version. Your feedback is welcome and very appreciated. Please do not hesitate to share them here. I will manage them accordingly with the Development Team.
Enjoy Mistika ?
-
-
Hi Mistika Users,
The Insta Pro 2 now saves the audio in origin_6_lrv.mp4 file directly. If you need to export with the high-resolution files the audio track please, follow the next workaround:
1. Import the high-resolution files
2. Do the stitching jobs.
3. Once you have your stitching ready, import the origin_6_lrv.mp4 file as camera number 7.
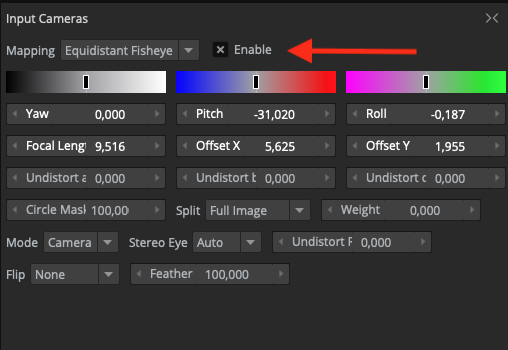
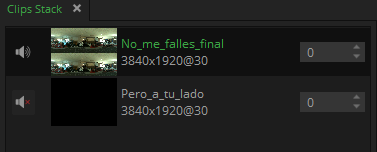
4. Select in the clip stack the origin_6_lrv.mp4 file.
5. Go to 'Input camera' control tab and do click on 'enable' to turn off the camera. As you can see the audio speaker can be selected in the clip stack so now you are ready to export your sequence with audio. Ensure the speaker in the clip stack is ON in the origin_6_lrv.mp4 file.
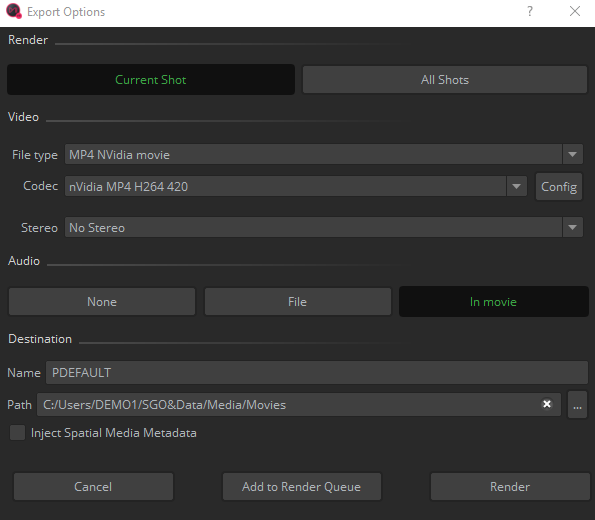
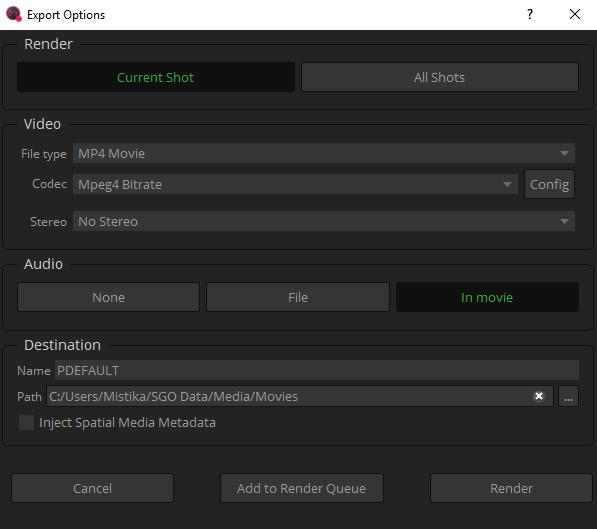
6. In the rendering process, do not forget to select the option for audio 'in movie' ?
Note: Mistika VR does not really process the audio, only pass it trough.
I hope it helps,.ro
-
 2
2
-
-
Hi Jesse,
You can save a preset in the shot which the stitch is good. To do that, go to the 'clip stack' and then do right-click>'Save preset'
In this same way in the rest of shots, do right-click>'load preset'. This is the easiest way for applying the same stitching in all your sequences ?
I hope it helps,
.ro
-
Hi nkyms,
Mistika does not reproduce audio on the fly but you can export it if the input media has at least 1 audio track that. If so, you can select it by clicking on one of the speakers in the clip stack as I show in the screengrab below:
In the output process, you can export the audio in the movie or well, you can export it as a separate file. See the options below:
I hope it helps,
.ro
-
Hi Joseph,
The Professional plan has access to big Features like S3D, Stabilization, Keyframing. You can check the plans here: https://www.sgo.es/mistika-vr/
I hope it helps,
.ro
-
Hi Joost,
Are you using the latest release 8.8.7? We found a bug in previous versions related to this issue. Please install the latest version and try again. If you still have issues with this, open, please a support ticket here: https://www.sgo.es/my-account/downloads/
all the best,
.ro
-
-
Hi all,
We want to share a trick for stabilization S3D Top/Bottom footage.
1. Import your clip TWICE: drag it to the timeline, and then, drag it to the left panel with the cameras list again, so it shows two clips as if they were two lenses.
2. Select the top clip, and in the Input Camera tab, change the "Stereo Eye" to Left, "Split" to Top Half, and Mapping to Latlong.
3. Select the bottom clip, and in the Input Camera tab, change the "Stereo Eye" to Right, "Split" to Bottom Half, and Mapping to Latlong.
4. Use the stabilize tool as usual
5. Render your results as a Stereo - top-bottom.
I hope it helps,
.ro -
Hola Baimusan,
Para formatos simples no es importante la RAM ya que se pueden leer y decodificar en tiempo real. Pero cuando se utilizan formatos difíciles, la RAM es el componente más importante para Mistika Review. Si una toma encaja en la memoria, la primera reproducción será lenta, pero una vez que se almacena en la memoria RAM, la segunda reproducción y las siguientes se realizarán en tiempo real, y también las acciones de barrido. Cuanto mayor sea la memoria RAM, mejor.
Puedes definir la cantidad de RAM para la cache en el panel Edit/PreferencesOptions/MaxCacheMemory. Hay que poner cuidado de no exceder los límites del sistema porque eso hará que se convierta en extremadamente lento. De hecho si tienes otras aplicaciones que usen la memoria RAM, te recomendamos que las cierres para hacer sesiones de review.
Saludos,
.ro
-
-
-
Hi Florian,You can stabilize pre-stitched video with a Profesional license. Import it to MistikaVR timeline. Then, in the "Input Camera", change the "Mapping" value to "LatLong" so Mistika understands it is not an unstitched camera but a full lat-long mapped stitched video. Now, you should be able to use stabilize as usual.I hope it helps,Rocío
-
-
-
Hi t-miyazaki,
The latest version includes a new feature for InstaPro for stitching a shot. If you cannot make it work properly then can create a new preset if you send a camera test (a frame of each camera is enough) to the Support Portal http://support.sgo.es/helpdesk/tickets
The test must follow the next:
First, try to obtain a suitable scene for the calibration:
- Nothing and nobody close to the camera, at least 3 meters
- A street with buildings and trees, squares, parking lots
- Large halls, like sports venues, with a structured ceiling, with camera in the open
- Public garage with no cars or columns at less than 3 meters
If a calibration shot cannot be obtained, choose the shot most fitting the above
Optional, especially convenient for cameras with little overlap: Ask for a static scene, and two shots, second with the rig rotated half its camera spacing: Means if they are 4 cameras at the horizon at 90 degrees, rotate the rig 45 degrees. This provides an apparent doubling of a number of cameras and produces better lens distortion detection.
Notice that if a camera allows setting the image ratio at different values, like GoPro that can record both 4:3 and 16:9, settings for both resolutions may be needed. Recording a larger image is always better but some customers used 16:9 ratio apparently.Looking forward to hearing from you in Support,
.ro
-
Hi Ben,
We can create a preset if you send a camera test to the Support Portal http://support.sgo.es/helpdesk/tickets
The test must follow the next:
First, try to obtain a suitable scene for the calibration:
- Nothing and nobody close to the camera, at least 3 meters
- A street with buildings and trees, squares, parking lots
- Large halls, like sports venues, with a structured ceiling, with camera in the open
- Public garage with no cars or columns at less than 3 meters
If a calibration shot cannot be obtained, choose the shot most fitting the above
Optional, especially convenient for cameras with little overlap: Ask for a static scene, and two shots, second with the rig rotated half its camera spacing: Means if they are 4 cameras at the horizon at 90 degrees, rotate the rig 45 degrees. This provides an apparent doubling of a number of cameras and produces better lens distortion detection.
Notice that if a camera allows setting the image ratio at different values, like GoPro that can record both 4:3 and 16:9, settings for both resolutions may be needed. Recording a larger image is always better but some customers used 16:9 ratio apparently.Looking forward to hearing from you in Support,
.ro
-
-
Hi dhi,
First of all, apologies for the delayed response. We have been improving the Forums and they were inaccessible the last week.
With regards to your question. Try the next please:
– Open the review control panels. (disable when launching the app the first time). You can load it from Window>Panels>Review controls.
– You will see there is a tab for clip, segment or Global. Well, if you load a TB clip, you can scale in Y with a value of 200% and the Offset in Y about until getting only one eye in the visual editor. If you apply this value in the Global tab, then all the TB you load into Mistika RW will have the same settings.
– Once you see only 1 eye, then go to the Clip control tab. You will see the convergence parameter. If you increase this, then you will have a B&W Anaglyph view. Of course, you must select B&W option in the stereo panel views.
That’s the only way I know to do that at the moment in Mistika RW. If somebody else adds a piece of light on this, is very welcome
I hope it helps,
.ro
-
-
-
Hi Christophe, The standard aspect ratio for any spherical projection in an equirectangular projection is 2:1 because is the only way to avoid a distortion on the poles when creating the sphere. When you create a new project in Mistika VR you choose the output in 2:1 when selecting the resolution. Once you create the project, just import the cameras and probably clicking on Stitch>Import Kandao calibration you do not need to load a preset. In any of the cases, if you send me a frame of every single camera to support@sgo.es I will create an optimised preset for you :) Best, .ro
Bug Mistika Boutique 8.10
in Releases
Hi mail18,
Thanks for reaching out! First of all, let me tell you that this issue is surely caused by "Retina display mode". The development team is already working on the fix. At the meantime, the workaround comes by choosing the 'Low resolution' option in the Retina Display window manager in your Mac system. To see the scaled formats, just press alt+key in the 'Scaled' option area.
I hope it helps,
.ro