
Posts posted by Cristobal Bolaños
-
-
On 12/16/2019 at 5:49 PM, mail18 said:
It would be super nice to have a 'Locate' button to instantly jump to the 'Finder' / 'Explorer
You can already do that through the Media Browser. If you right-click on the file and click on "Navigate to source media", it will open the location in the Media Browser ?
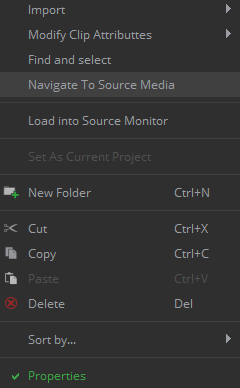
By the way, the "Find and select" is also a great tool! If you are navigating through your Media Browser, and you need to know where there is a particular clip located in your timeline, you can right-click the media file, click on "Find and select" and that file will be selected in your timeline. In addition, if you click then on the Zoom selected button (
 ), that shot will be zoomed and positioned in the center of your navigation.
-
 1
1
-
-
Hi Jan!
I'll proceed to briefly explain them ?
- The S stands for Selection. The function of this button is that, when you have multiple shots on a timeline, and you need to instantly find it in your media browser, you first click on the clip, then click on the "S" and now, if you open your Media Browser, you will find the clip selected.
- The MF stands for Match Frame. The function of this button is for both find the clip in the Media Browser, and also load in the Source Monitor the exact frame in which you have clicked the file.
Does this clear things up?
Let me know if you need further assistance
Cheers,
Cristóbal
-
3
-
-
Indeed, in this case scenario the best workflow would have been, instead of creating a new project, but to create a different folder for your brand new environment with the color re-doing. Hence, you wouldn't have lost the Private information (where the Vector paint data is located). Otherwise, if creating a new project is desired for organization purposes, as Javier said, copy the Private folder files into the Private folder of the new project.
Cheers,
Cristóbal-
1
-
-
On 12/9/2019 at 6:23 AM, jan1 said:
Something similar to the Resolve Standard Candle Benchmark?
There you have it Jan:
Cheers,
Cristóbal ?
-
2
-
-
Hi everyone!
We've created an environment for testing your system performance capabilities. Basically, it contains a 4 seconds video with 80 layers of color correction created. There, you can remove layers until real-time playback is obtained or sound synchronization is achieved.
You guys can find the environment attached in this post. It is a 1920x1080 and 24 fps timeline. The video file which you have to relink can be found here.
This is how the environment looks like:
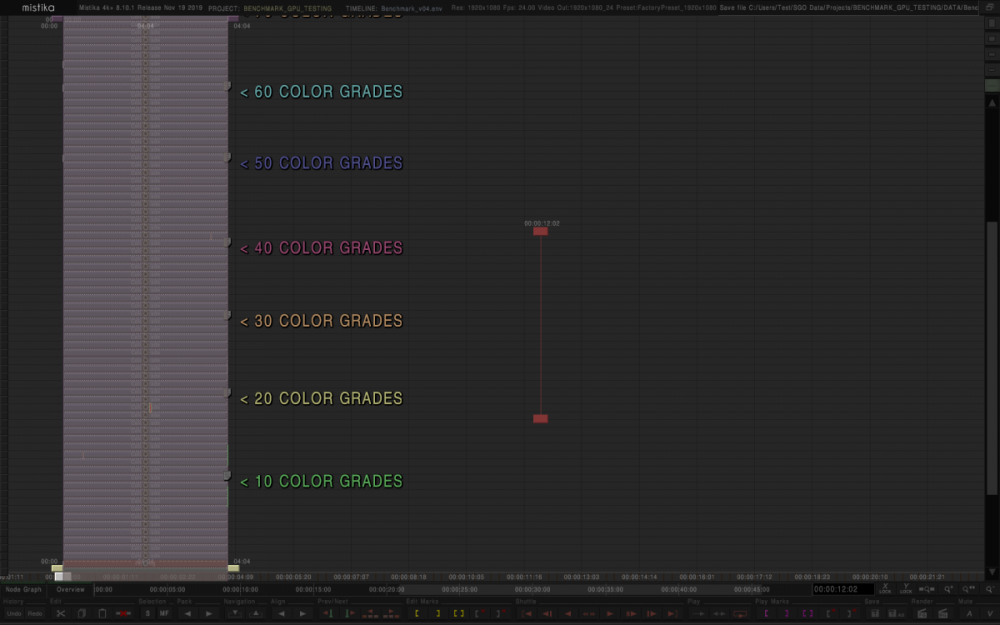
It would be great if you can share with us your results, describing your system specifications and the maximum playback you obtain. This way, we can share useful information for many users.
My system is the following:
Intel(R) Xeon (R) CPU X5550 @2.67 GHz with 2 processors.
12 GB RAM
64 bits
Quadro GV 100 graphics cardsThese are my results:
- Capable of reproducing 45 color grades effects with real time playback.
- Synchronization lost at 36 color grade effects.
- Capable of rendering 22.5 frames per seconds the 80 layers.Not bad!
Thanks a lot in advance for your collaboration.
Have a great day!
Cheers,
Cristóbal ?-
2
-
-
On 12/9/2019 at 9:21 AM, mail18 said:
Btw Is there a feature request list somewhere for Mistika Boutique?
PM me with them!
We will save your request and will consider it for discussion when our next R&D meeting takes place. If you have any additional questions, please do not hesitate to reach out.
On 12/9/2019 at 2:02 AM, mail18 said:My questions are:
The MacPro Route - How will the support be for the new Mac Pro, since it is using a AMD GPU (Vega II with 32GB looks very promising)
And wil the 'Afterburner' card be supported in the future? Since I got the feeling that Mistika is more Window's focused?The Windows Route - I know that Mistika is a GPU driven software system and for stability you advise to use a Quadro Card since it is tested that way.
On what other components does Mistika Boutique run best or what is the basic setup for a custom build Mistika Boutique workstation
It would be really nice to know what motherboards or CPU's are preferred or used in the systems to develop/debug Mistika Boutique.
So I can build a super stable workstation.Regarding the original question of this thread, one of my colleagues more into this kind of questions will get to you as soon as possible!
Thank you very much again and have a great day.
Kind regards,
Cristóbal
-
On 12/5/2019 at 1:42 PM, jan1 said:
I was looking to see if there's a better way to scroll up/down in the parameter tab on the left in the Visual Editor
I'm afraid there's no such shortcut that enables the possibility to scroll up/down the parameter menu.
On 12/5/2019 at 1:42 PM, jan1 said:We should collect more of these useful keyboard shortcuts.
Great idea. I'd happily collaborate with these excel. If we reach a consensus to a really neat shortcut compilation for working, we could make a nice designed shortcut cheat sheet made for printing for the users.
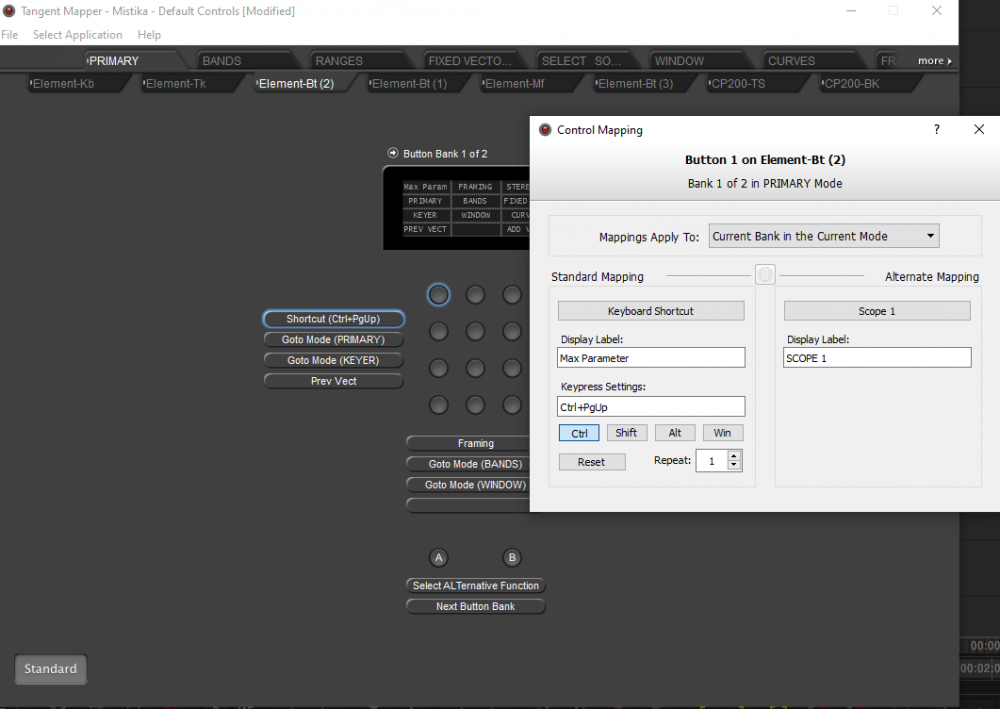
Just as a friendly reminder (also for people who do not know this feature) , in the Tangent Mapping there's the possibility to make a Shortcut button. You could make the Control+PgUp shortcut an even faster access with the Tangent:
-
2
-
-
Hi guys!
It is planned in future versions to be added a Display Filter which will enable an overlay safe title area. You can check it in the following screenshot:
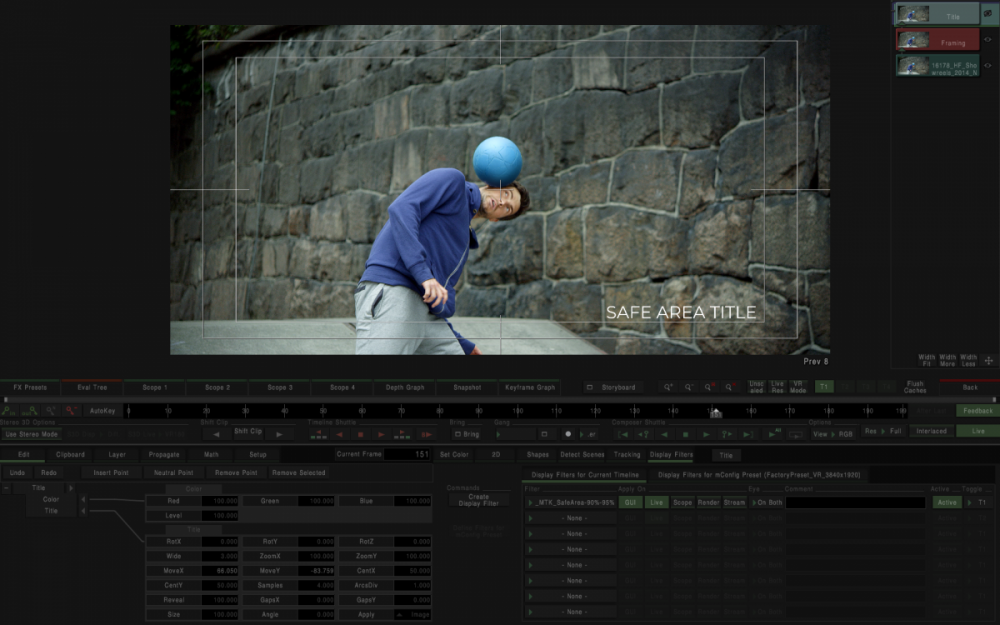
It is based on image percentage, which means it will be adapted according to the resolution.
I have attached it in this ticket for you guys to check it! You have to place it on SGO AppData > shared > displater_filters folder. Next time you open Mistika it should be available.
We hope you like it!
Cheers,
Cristóbal
-
3
-
-
On 12/2/2019 at 1:53 PM, jan1 said:
The work around would be to quickly add a history (mapped on the panel) to preserve the current. Then you can cycle through the different presets with 'replace' and if you don't like it just restore the history as an undo.
Exactly. Or do the same with Fx Presets, saving first the current mode.
-
On 11/26/2019 at 4:12 PM, mail18 said:
Where can I find the legacy download section for Mistika Boutique?
I'll send you a private message with the download link!
-
1
-
-
-
On 11/25/2019 at 7:15 PM, mail18 said:
Windows cost wise and MacOs interface wise
The endless debate between cost and userfriendlyness
-
1
-
-
-
On 11/24/2019 at 7:53 PM, mail18 said:
Do you think it would be possible that the are not hidden by default, so I can grab them more easily?
I'm not a big expert (nor big fan) of MacOs, but there has to be a way to permanently show hidden files of all folders. I'll look into this subject and let you know.
-
-
Hi Jan!!
On 11/21/2019 at 3:43 AM, jan1 said:Would it work to keep one project, but just open it with different configs as output requires?
Yes, Mistika will make a friendly reminder, then will make the all the resolutions fit the new mconfig settings. Resolution in Mistika is dynamic, which means that you can set your project first at a smaller resolution like 1920x960 in order to have a better playback. Later, in the final output, you can set 4k for instance, and make screen tests.
On 11/21/2019 at 3:26 AM, jan1 said:I know in the output section I can select the resolution.
That's what I would personally do instead of switching resolutions in the Mconfig avoiding exiting Mistika. I would set project resolution to the maximum, in this case, the 5k, use display filter and different framing for adjusting everything properly in order to have comfort display, and finally then in the output, force the scale output to the fitting resolution of each shot. If you make render presets, it's even quicker.
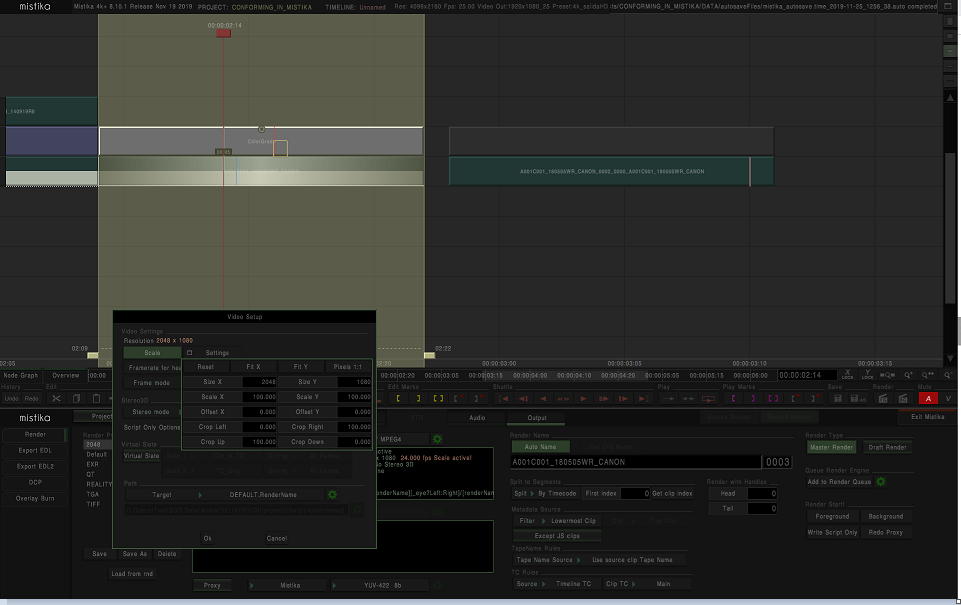
In this case, this is a 4K project, but with 4k and 2k shots. I want them rendered with the original resolution. I select the 2k shot, go to the VideoSetUp. select scale and type the 2k resolution. Then, I make the render preset for smooth workflow.
-
2
-
-
On 11/21/2019 at 9:44 PM, mail18 said:
it would be really fantastic if it would be possible from the Color interface
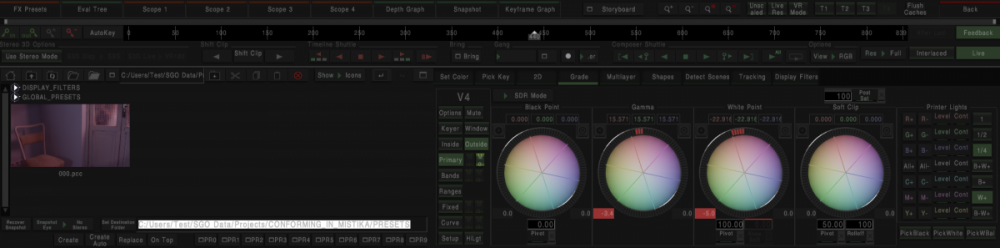
If you create a FX preset, which is done on the FX preset tab of the Visual Editor, you can go to the destination folder and you will see two different file created: the pcc file, which is the color information for Mistika, and a dpx file of the image:
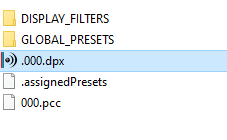
I know you are looking for a file different from DPX, such as JPG or PNG (as Jan said, that's already a listed feature request), however, the DPX is the format which you can be sure there won't be compression and the color information will be best translated.
Hope it helps!
Cheers,
Cristóbal-
1
-
-
On 11/20/2019 at 1:34 AM, mail18 said:
today all issues are gone luckily
Do you mean they no longer happen? Glad to hear!
Just bear in mind that is not advisable to work a long time with the autosaved environment. As long as you use, make a "save as", and place it in your usual environment folder.
As a friendly reminder, you can decrease the time for the autosave save and the auto versions kepts in the general tab of the Mconfig:

If you even encounter any issue, please, submit a ticket in the SGO Support Portal ?
Cheers,
Cristóbal
-
2
-
-
Hi Jan!
Can you please check the read/write permissions of the auto saved environments?
I highly recommend when you are working with an autosaved environment, to make a "save as" and make it a normal env. Actually Mistika makes a quick warning about this when working with autosaved envs. That can avoid this kind of issues.
Looking forward to your answer
Cheers,
Cristóbal -
Quicktip: Did you know that you can use that tool in combination with the Scopes? ?
Let me explain:
If you use the Color Picker, the values will be highlighted in all the Scopes as well. As you can see in this screenshot:
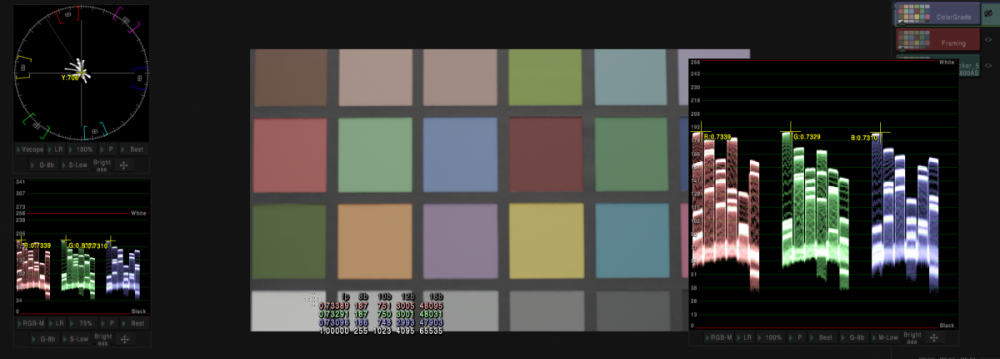
This is a really handy tool, specially when it comes to neutralizing the black and whites.
The pure white is obtained when all the rgb values are the same. So if you use the color picker, and check if they differ, you can use the printer lights in small steps to equalize all the values.
Hope you like this quick Mistika hack!
Cheers,
Cristóbal ?
-
2
-
-
Hi Jan!
I'm sorry for the inconveniences. Thanks a lot for the report. We've immediately communicate the issue to the dev team. They'll fix it asap.
For now, I can suggest you two possible workarounds:
- Downgrade to a previous version without that issue.
- Use the Keynode in combination with the Output Key, and the Blur Node, which you can set in Mode A and will blur only the alpha, that can be later used on any shot. I know it's a bit messy, but workable in the meantime.
I'll let you know whenever the fix is ready.
Thanks a lot for your time.
Cheers,
Cristóbal-
1
-
-
Now I see. Sorry for the misunderstanding.
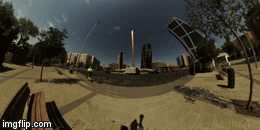
Animating the camera from the inside of a sphere is made through the Tiny Planet Mapping. As you can see in this gif, the camera looks like it is rotating from the center of the sphere:
However, I'm not sure if the parallax effect you're looking for is achieved through this mapping. Let me do some research and I'll get to you as soon as possible.
Cheers,
Cristóbal -
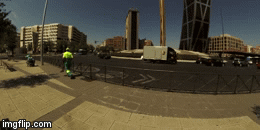
Hi Milos!
Let me check if I understood you well. What you are aiming is to create a zoom in which there's an illusion of parallax because of the deformation of the edges of the image, as if there were a camera inside a 360 sphere zooming (ore moving around) from the inside.
That can be made throughout keyframing on the VR View and the VR Stitch effects, having selected previously the Tiny Planet mapping.
You can choose between two different ways:
- Inside the VR Stitch: on the Output Camera tab, select the Tiny Planet Mapping. You have to deselect the Optical Flow parameter. because it does not work in combination with the Tiny Planet mapping. Now, move the Yaw, pitch, and roll until you have the desired. Then, animating with the Focal Length, you will be able to zoom in or out. Keep in mind that you will get the desired effect as long as you have the distortion on the edges, that's why not every shot is capable of creating that ilusion.
- Inside the VR View: first you need to make your stitching in the VR Stitch node. Then, you can put on top the VR View mode, or render the video or 360 still image. In the VR View select the Tiny Planter mapping. As in the first way, now you can animate through keyframes the focal length, yaw, pitch and roll until you get the desired result. You can make different camera moves, not only the zoom in effect. I'd recommend this way, because although it requires a pre-render, things will be smoother in terms of playback.
Hope this helps!
Let me know if you have any technical issue.
Cheers,
Cristóbal -
Hi!!
Yes, as Jan said it is an already known issue and the dev team is already taking care of it. It is expected to be fixed in the short tem.
I'd like to add that you can also work transitions inside Mistika timeline editor and work directly with the conformed footage. Besides, Mistika has better color science than Premiere, which leads for better results in the final render I can vouch for ?
Apologies for the inconvenience. I'll let you know whenever the fix is ready.
Cheers,
Cristóbal-
1
-


What does this button do??
in Releases
I will add it as a feature request!