
Posts posted by Cristobal Bolaños
-
-
Hi Andrew!!
Indeed, Mistika VR can analyze only the color of a the small area limited in the timeline by the "In" and "Out" points.
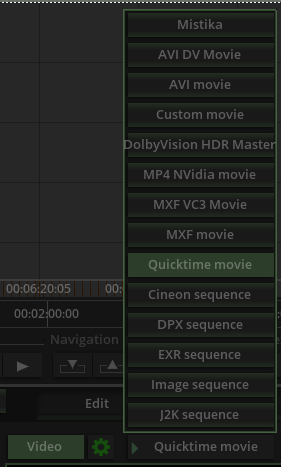
To do so, you can set these In and Out points with the keyboard shortcuts "I" and "Out", or with the Edit marks buttons you can se highlighted in this screenshot:

Then, if you click on Color > Match Color in Time, Mistika VR will analyze only that area and do the matching.However, I'm afraid that your needs won't be reached with the aumatic matching color functions. What you describe is a major issue that will be probably be solved by keyframing exposition. Mistika VR has only color parameters for exposition, temperature and tint, it is effective for VR color matching between the different cameras, however, extreme situations like that one is difficult and should be done manually.
I hope this information helps! Let us know if you have any other technical question. We'll happily help as soon as possible.
Cheers,
Cristóbal -
On 10/25/2020 at 7:16 AM, JanMaarten said:
Sad to hear, form a colorist point of view it would be such a big addition to the 'Fixed Vectors'
There are new tools part of the Fixed Vectors tab, which are about to come and will be really exciting for colorists :)
All the feedback from you guys is taken into account really seriously. I'll gather the information you've mentioned here to add it in the feature request list. The road development map is already fixed for the short term, but I'm sure all your suggestions will be considered.
Cheers,
Cristóbal
-
 1
1
-
-
Hi Jan!
Thanks a lot for letting us know your feedback. It's always highly appreciated.
Unfortunately, the possibility to add the Ranges into the Fixed vectors is not present in the development road map in the short term. The workaround to get similar results would be to make selections based on luminance in the Qualifier.
Regarding the LUT request, it is indeed planned in the medium term :)Cheers,
Cristóbal
-
Yes you can do that. However, I recommend you first perform the stitching and later you stabilize it. That way first you focus on the stitching and then in the postpro effects. Actually you can use the stabilization feature inside Mistika VR, which processes the stabilization once the stitching is done.
-
-
Hi Jan!
I highly suggest you take a lookt at tomorrows webinar by Paco Ramos:

He will address several topics that we've been discussing in this thread with much more detailed information. I'm sure you will like it :)
Cheers,
Cristóbal
-
2
-
-
Hi Stefano!
It's expalined on the Mistika VR manual on chapter "7.8.1.1 How to export the audio track with the Insta Pro 2 cameras". I'll paste the info here :)
The Insta Pro 2 saves the audio in the file called origin_6_lrv.mp4 file directly. If the user needs to export with the high-resolution files the audio track, the next
workaround is the one to proceed to:1. Import the high-resolution files.
2. Do the stitching jobs.
3. Once the stitching is ready, import the origin_6_lrv.mp4 file as camera number 7.
4. Select in the clip stack the origin_6_lrv.mp4 file.
5. Go to 'Input camera' control tab and do click on 'enable' to turn off the camera. As you can see the audio speaker can be selected in the clip stack so now you are ready to export your sequence with audio. Ensure the speaker in the clip stack is ON in the origin_6_lrv.mp4 file.
6. In the rendering process, do not forget to select the option for audio 'in movie'
I hope you find it useful!
Cheers,
Cristóbal -
Hi Jan,
Sorry for the late reply.
I'm afraid what you are looking it's not possible currently in Mistika. The replace tool you need is not developed yet.
The relink tool will work for media that has lost the the source of the file, but it's located somewhere and you can relink it to the new location.
However, you are trying to replace a .mov file to a .mp4 file, therefore, the metadata does not matcha and Mistika will not be able to relink those two files.
The replace tool will eventually arrive. It's in the road dev map but I'm not certain about when it will be available. Sorry for this inconvenience.
Cheers,Cristóbal
-
 1
1
-
-
Thanks a lot for sharing this. The changes are very nuanced, but still those are elements to take into account seriously when dealing with a project.
On 8/28/2020 at 2:35 PM, JanMaarten said:Still the 'ACES ODT' and 'OCIO' are a bit to contrasty and oversaturated compared to the LUT provided by ARRI especially in the highlights.
Also we have to bear in mind that the LUT provided by ARRI is backed up by the color science of the manufacturer itself. So, unlike a lot of LUTs that can be downloaded on the internet, this is for sure one that can be trusted.
-
2
-
-
Hi Jan!
Indeed, as Yoav said, Unicolor makes color transformation based on sheer mathematical operations. It lacks tone mapping and that can lead to over exposed images. The way to tackle this is simply by manually setting the signal somewhere where you feel it should be according to your image and signal response. In other words, by manually adjusting the tone mapping.
Also, you can use the ACES ODT. ACES color science has an amazingly well crafted tone mapping that creates a pleasing tone which was created after multiple case studies and screen audience tests. However, color tools in ACES will not respond to the signal the same way that you are used to on a regular rec709 signal.
Both approaches, as well as the the use of a LUT crafted by the manufacturer are perfectly okay and respectful to the color science of the camera you use. Depending on the project and your needs, you can decide which suits you the best ?
Cheers,
Cristóbal
-
2
-
-
This feature you are asking will be included in the new interface tools that will redesign the gallery and management of stills, as part of the development roadmap of Mistika 10.
Thanks a lot for the kind works Jan! They are really encouraging! ?
-
1
-
-
Hi Jan!
That's already been requested and it is listed in the feature request documentation. Thanks for mention it again.
Mistika currently only saves stills in dpx because it's supposed to be the best way to deliver images so they contain all the grading information without compression.
As Yoav mentioned, there are a couple ways you could transform your stills images into jpsg:
- With a Watchfolder, that you may even connect to a mail or a delivery service available in Workflows.
- With render presets in Boutique, and quickly setting the in and out points only covering one frame for the render.
Maybe other users come up with even better ideas to perform this operation.
Cheers,
Cristóbal
-
1
-
-
Hi Rob!
First of all, thanks a lot for the feedback and detailed messages you wrote to us. They were extremely helpful.
Indeed, we have identified a discordance between Workflows and Boutique when it comes to render fps conversions. The dev team is already aware of this issue and will for sure fix it as soon as possible, so Mistika Workflows and Boutique are consistent between each other.
Once gain, thanks a lot for your collaboration :)
Cheers,
Cristóbal
-
1
-
-
Hi Jan!
The Max Cache memory, indeed works with RAM memory. All frames that are read from disk and decode are kept here, which are the most recent frames. If the GPU needs images that were read before, they are still there, so it's not necessary for doing again the process of decoding the effects and reading the files from disk. This is specially useful when you are looping several times the same shot. The first will probably not have real time playback, but once Mistika processed it and saved the cache, you will real time playback.
Indeed since you are a pretty powerful machine, you may increase, but I don't recommend it increasing it a lot. This value is pretty sensitive, and if you take out cache memory from the system, which cannot be used for anything else , you can run out of memory easily and probably cause a crash. I recommend increasing it step by step, maybe first time double it, and then check the performance. You may try for example a multiplayer EXR which will for sure demand a lot of the RAM memory.
Let me know your results! :)
Cheers,
Cristóbal,
-
1
-
-
Indeed, as Yoav said, it should be pretty straightforward.
Be sure that you are importing a clip with the Alpha channel inside. Check that the codec you are using supports for the alpha embedded.
You can also export the alpha channel as a separate normal RBG file, and then use the External Key effect to add an alpha to the desired clip.
Cheers,
Cristóbal
-
-
Hi Jan!
Thanks a lot for reaching out. That's a pretty interesting question. The short answer is that the Visual Editor is optimised for the real time modifications made in the image, whilst the Timeline editor is optimised for having real time playback.
The long detailed answer is pretty well explained in this particular webinar:
Check it from minute 07:52 : Why two suttles? (Timeline & Composer)
You'll see more details there :)
Cheers,
Cristóbal
-
2
-
-
Hi Jan!
Mistika Boutique supports for all industry standard codecs:
What other codecs do you need for Mistika Boutique to support?
Pro Res RAW and Black Magic RAW are not supported currently, but it will eventually be. It's in the development road map ?
If you ever finds troubles with the conforming process, please, reach us at the support portal and we will help you as soon as possible.
We wrote this document to help with the process of comparing the offline file and the conformed timeline: How to compare a conformed timeline with the offline reference version
Cheers,
Cristóbal
-
Hi Hugh!
Adding on Yoav last message, there are different ways to create softness on shapes.
The main way is to go to the Shape tab and drag horizontally the Width, Offset, Inside and Outside buttons:
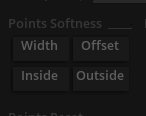
However, you don't need to access these buttons to create softness. You can do it by dragging horizontally the shape selected with your middle button of the mouse:
- If you drag with the middle button it will do width softness.
- If you drag with the middle button while pressing Alt of the keyboard it will do Outside softness.
- If you drag with the middle button while pressing Control of the keyboard it will do Inside softness.
- If you drag with the middle button while pressing Shit of the keyboard it will do Offset softness.
Let me know if it works for you please ?
Cheers,
Cristóbal-
1
-
-
Hi Jeff!!
Indeed, when you have "one big adjustment layer" the navigation between the different stacks can be a bit more cumbersome. However, as you mention, there are multiple ways in which you can overcome that issue.
You can have those big adjustments layers hidden, until the last process, in which you use them as final touches, and you don't really need to pay attention to them.
You can have one big group in which inside you have all the timeline, and the outside the group a couple of adjustment layers.
And of course, you can use the split conform to guarantee a smooth navigation between the shots.
The time space in Mistika is pretty flexible, it allows to use the same tools in a lot of different ways!
Cheers,
Cristóbal
-
1
-
-
Hi Jeff!
On 6/1/2020 at 10:48 AM, jeff@dungeonbeach.com said:Definitely the best feature has been the mini curve / histogram in the bottom right which visualizes your corrections (does this thing have a name???). It's been very helpful for "look development," because you can see how you are affecting the curve. Visualizing the RGB separation helps make creative choices.
We'are so glad you are getting yourself comfortable with Boutique! Indeed the visualizing of the RGB separations is a great help to se what you are actually doing to the image. It's pretty.
We can call it waveform ?
On 6/1/2020 at 10:48 AM, jeff@dungeonbeach.com said:Maybe it would be better to have the button that reveals / hides the FX presets in the middle / bottom left?
Dev and GUI design team will look this option among others to see how this can be improved. Thanks a lot for the feedback!
The same goes for the FX preset design. That will be renewed as you mention.
On 6/1/2020 at 10:48 AM, jeff@dungeonbeach.com said:A dream request would be the ability to drag thumbnails directly form the visual editor into a Gmail compose window -- we colorists are needing to send stills to clients constantly. Not just during Covid. It would definitely save quite a bit of time to not have to save a preset, switch to Windows, navigate to the SGO Data folder, project, etc., open the DPX in photoshop, convert to jpeg, find it, attach it to gmail...
You can actually do that pretty quickly with the Watchfolder functionality of Mistika Workflows.
You could make a Watchfolder node in which you save stills from Boutique in DPX (to retain maximum quality), but then in Mistika Workflows, convert this DPX automatically to PNG (for example) and send it your client by mail. The magic of this, is that this process will be automatically made everytime you set a new DPX in the Watchfolder. Let me know if you need more information about that ?
Here you have a tutorial explaining how it works:
-
1
-
-
On 6/1/2020 at 10:23 AM, jeff@dungeonbeach.com said:
One thing that jumped out to me is I wonder if the "up" and "down" arrows should be reversed. Currently, the "up" arrow (above function keys) toggles the button banks. And the "down" arrow toggles the knobs. But actually it's the knobs that are on top (on the panel) and the buttons on bottom. So possibly the up arrow should toggle the knobs and the down arrow should toggle the buttons.
Great idea! Now that you mention it, I also think it's better that way ?
On 6/1/2020 at 10:23 AM, jeff@dungeonbeach.com said:One area where I got tripped up was trying to navigate from printer lights to bands. Because printer lights is now on a sub-bank of primaries, when you are using the printer lights, you don't see the bank navigation anymore. So it's two button presses to get to bands. First you have to press the up (or was it down?) arrow to get to the home bank, then you can go to bands
Indeed, the navigation between modes gets a bit more cumbersome when moving out from the Bt bank 1,the "Navigation bank" so to speak.
I came up with this idea: How about we map in the Alternative Bank of the Up/Down arrows the buttons "Next mode"/"Previous mode". That way, you could jump between modes in quite an easy way. What do you think?
I have attached the Mapping with these two changes in the thread so you can give it a try ?
Tangent_Mapping_Wave2_NextMode_PreviousMode_v01.xml
On 6/1/2020 at 10:23 AM, jeff@dungeonbeach.com said:Just curious...there's no "Offset Cyan, Offset Magenta, Offset Yellow, Cont Cyan, Cont Magenta, Cont Yellow," right? Part of me wonders if it's just cleaner to put the "printer lights" on dials for the cramped Wave2...
There's no such a thing of a Contrast Cyan in the Dial. However, if you set the Printer Lights mode on Contrast, and then with the mouse drag up the Cyan column it will act like so.
To do it with the trackballs, you set the Primaries Mode on Contrast, and then move the Gain towards cyan, and it will do the Contrast function.
In the dials for the tangent you have all these dials that are part of the Printer lights:
Normal:

Alternative:

Bests,
Cristóbal
-
-

VR Stitch FX: improving colors between cameras
in Releases
Sorry Andrew, I though the question was about Mistika VR.
With Mistika Boutique you can do the following techniques:
- Make cuts in the clip inside the Timespace, so you can isolate each of the segments and you can treat them independetly.
- Put a Color Grade above of all and make keyframes usign the Primaries tab of the Color grading, matching all the segments until you get the best result possible.
Here you have a tutorial about how to do dynamic grades in Mistika: