

-
Posts
213 -
Joined
-
Last visited
-
Days Won
51
Content Type
Profiles
Forums
Calendar
Posts posted by Cristobal Bolaños
-
-
Hi Rakesh!
When you are playing the audio, do you have the option to show the waveform? If you go to edit - setup - show strip de audio, you can deactivate that and it will play a bit smoother.
If that's not the case, please send us the red clip and the audio clip and we will work out a way to make the playback smoother. Please, submit a ticket and we will deal with the situation.
Best regards,
Cristóbal -
Indeed!
Transitions always work best when they have only the needed inputs. You will notice that you will have smoother workflows within Mistika when you get used to its philosophy in terms of groupings the stacks, that will always be available in the visual editor to easily access to every effect. Groups work also as timelines, that you can go inside and do whatever you want.
Also bear in mind that the Key In and Key Out are not designed for every effect. For instance, they don't work for the Sapphire effects. They are specially built for creating dynamic grades in the Primary and Bands in the Color Grade effect.
Hope you find it useful!
Best regards,
Cristóbal-
 1
1
-
-
Hi Rakesh and Jan!
After digging into Rakesh timeline, and then by keeping testing the Sapphire transitions, it seems that they must be set up properly in terms of inputs to work fine.
Most of transitions need only two inputs, so the stacks of effects need to be grouped so the Sapphire transition analyze only the two clips to perform the transition. Such as in the screenshot attached. The input one has to be the shot on top and the input 2 the shot below.
In order to set the keyframes, first, I activated Autokey. Then, I went to the Angle parameter, click zero, and press the enter button on the keyboard to insert the keyframe. Then, I went to the end, set 1 on the angle parameter and clicked on enter to insert the keyframe. It worked fine.

-
1
-
-
On 6/3/2019 at 10:53 AM, jan1 said:
Is there any documentation from Tangent on how their mapping works?
Hi Jan!
Sorry it took quite a time to answer. I'm afraid that there's no open source documentation on how Tangent mapping works internally. According to the dev team, we could force the code of the Tangent Wave2 so it can develop a B button for Bank2 mapping. However, that will break the tangent mapping software.
-
1
-
-
Hi Jan!
That's actually a great preset for beauties. But I can think of different ways to perform that in Mistika.
On 6/28/2019 at 4:45 AM, jan1 said:it complicates the node tree by having to copy the original clip.
First of all, I reckon that if you create a node tree with dummies, and then replace them with your footage, it will be utterly easy and quick to perform the frequency separation.
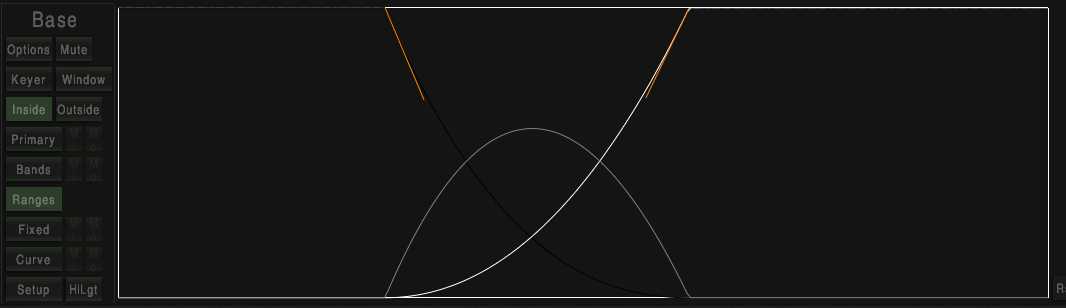
Secondly, I think that there are two tools inside the Color Grade node, which combined can work as a frequency separation with keying selections of the skin. The first one, of course, is the Keyer tool, and the second one is the ranges:
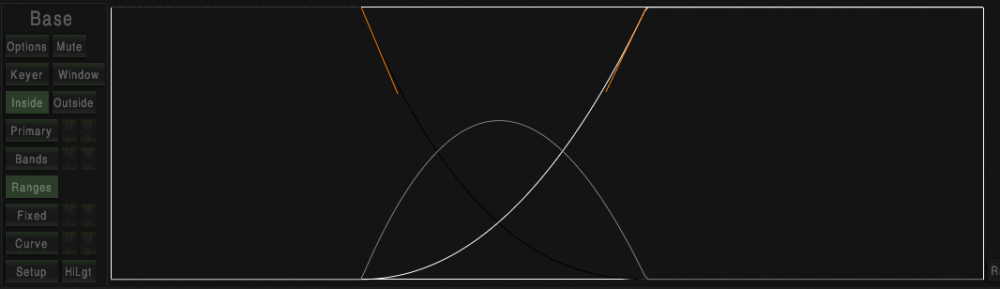
With the ranges you are limiting the signal of your correction in that specific node. In this screenshot, you can see I'm selecting only the middle range of the image. With your right-click, selecting the upper left side of the square you can move to low frequencies to the right, as opposite, with the left click in the upper right of the high frequencies to the left. The orange lines are activated with the left-click of the mouse, and control the softness of the selection. Of course, if you own tangent panels, this is easy peasy to manipulate.
So, you can have a selection of your skin and then adjust the ranges to only manipulate the middle frequencies, or the higher ones, and use all the color tools to manipulate only that area.
I've told more Mistika advanced users about this issue to see if they come up with better ideas that fit your matter. Sure, they will answer shortly!
Hope it helps!
Cheers,
Cristóbal-
1
-
-
Hi hendrik,
Thanks for reporting this issue. I will add the report to the bug data base in order to be fixed asap.
Best,
.ro
-
Hi!
You can download the pdf in the following link: MistikaVR_ShortcutCheatsheet. That one is more appropriate for printing.
Thanks for the feedback. We'll make the cheatsheet fit the whole page in the manual as soon as possible.
Cheers
Cristóbal-
1
-
-
On 6/1/2019 at 2:57 PM, jan1 said:
In terms of me being able to customize the mapping, is there a way for me to add another button bank or change the behavior of the alt button from a shift to a toggle? I assume that involves some of the other .xml files. Do you know if there are examples or documentation. I briefly looked through them, but haven't fully decoded it yet.
As far as I know, the tangent mapper only allows having one bank and the inner alt mapping. The tangent mapper software did not allow us to have a second or third bank. However, we'll study the possibility. Maybe we can upload different mappings inside Mistika for users to decide which one fits better for them. Besides, we'll look into how to change between mappings with the Wave2 itself.
Offtopic, Jan, please would you tell me how many tangent elements units do you have?
Cheers,
Cristóbal -
Hi Rakesh!
Xml is the best tool to conform between Premiere and Mistika. In order to solve this issue as soon as possible, please, submit a ticket in our support portal. We'll need the offline reference and some of the clips that are failing to conform so our developers can check may be causing the issue.
Cheers,
Cristóbal -
On 6/1/2019 at 8:57 PM, Rakesh Malik said:
just went through this process, and my panel isn't connecting. I'm trying with the 8.8.2 beta -- and I'm also not seeing an image from my AJA module now. I'll back up to 8.8.1 and try it again, see if maybe it's a beta problem.
Hi Rakesh!
Please check that everything is set up properly inside the Mconfig. If you submit a ticket in our support portal and you give us more details we can sort out the problem as soon as possible.
Cheers,
Cristóbal -
Hi Jan!
The Wave2 it's quite limited to the quantity of buttons and knobs it has, that's why we had to make some decisions that may not fit to every user. The philosophy we decided to follow when we mapped the Wave2 was to provide the user all the possibilities that all windows has in the Color Grade. Besides, when we map tangent control panels, we prefer to let the user have the possibility to travel quickly between windows. That's why the buttons for accessing windows are always stacked in the same place.
We realized that the knobs can be used as buttons too. Normally the knob button is only used for reset values, but we though we could harness this possibility a bit more. In the windows tab for example, you can use the knobs as buttons to activate or deactivate the default shapes (line, square, circle...) and use other knobs to rotate them, make them bigger... The same with the curves, some knobs are for using them as on/off buttons and other for rotating values purposes.
Indeed, the alt function is used to access to a lot of features, that's mainly because the lack of buttons. All tangent devices are designed for two hands.
However, we are really open for suggestions and changes in the mapping. If you come up with a better mapping we will be delighted to test it, and even apply it as the default mapping. As you said, with the new library is cleaner and makes it easier to find the features ?
Cheers,
Cristóbal-
1
-
-
Hi Loren!
Indeed, what you can do is to bypass the Comp3D node you used to stabilize your footage. If you open the Eval tree node and click on the eye, it will bypass the effect and disable anything you applied inside that Comp3D node, like the stabilization. To speed up the process, you can use the shortcut "D", while having selected the node, which will bypass the node as well:
Hope it helped!
Cheers,
Cristóbal -
On 5/13/2019 at 8:57 AM, jan1 said:
In doing so, I found it easy enough to change the mapping with the Tangent Mapper. But I also found the current Mistika mapping library extremely messy
Hi Jan!
In the following attached thread you can find the solution for the issue we were talking some time ago regarding the mapping library:
Since you don't have a Wave 2 you'll need to follow only the first three steps to have the latest files for remapping your panels. I'm afraid that your mapping may suffer some changes due to the new library, but it will take just a few minutes to adjust the button functionalities.
Hope you find it useful! ?
Cheers,
Cristóbal -
Indeed, for now, is better to use that workaround. The feature is supported but using Mocha is still laggy and we are working with Boris FX in order to make the conversation between the two softwares more smoothly!
-
3
-
-
I also suggest using Mocha Pro. The content fill aware feature really makes the difference and it is fully supported in Mistika.
Cheers,
Cristóbal-
1
-
 1
1
-
-
On 5/17/2019 at 8:43 AM, Aurora Films said:
- Is it possible two get the GLSL node to take two inputs? I can see I can connect several inputs in the node graph, but can not find an example of how to specify these in the internal code.
The GLSL is a one input node, which can be an image with or without alpha channel. It can be an image with changes specified by the GLSL parameters or an alpha masked with changes specified by the GLSL parameters.
I'd like to add that every time you have questions related to the input a node can have, that's information you'll find really easily in the official manual. All nodes have information about their inputs capabilities.
On 5/17/2019 at 8:51 AM, Aurora Films said:Self answered first question.... Channel Booleans node.
Yes! The booleans nodes contain all sort of operations to work with! In companion with the channels, there is a myriad of operations to work with.
Cheers,
Cristóbal -
Hi Jan!
This is awesome. It really helps a lot. I could download your mapping, import it to my system and play with it. What's more, I could easily change between the default mapping and your personalized mapping. So thanks for that, we tested and we already know we can share with the community and improve the customization of the user experience.
On 5/13/2019 at 8:57 AM, jan1 said:But I also found the current Mistika mapping library extremely messy
Regarding this, this is exactly what we are currently developing. We are organizing the tangent mapper in a way that is more intuitive and easy to remap. I'm sorry you had to do it just when it's been done. Hopefully, it will be implemented in the forthcoming betas. So thanks a lot for the feedback, we will take it into account. Apart from that, I'll look into for the features you're missing in your mapping. Keep in touch!
As always, thanks a lot ?
Cheers,
Cristóbal-
1
-
-
Hi!
This is my workflow on how to clone and tracking for object removal in Mistika
. In this case, I'll explain how to remove the logo of Gameboy Advance in this shot:

First things first, we place a framing effect on top of our clip, and set the “Result size” parameter in “Project”, and the “Fit” parameter in “Crop to fit”, I group it and use that as the footage. Then, I copy and paste the Shot, and make a freeze frame. This tutorial explains how to freeze a frame in Mistika. Now, I extend the freeze frame the duration of my clip. For that, I use the Get Duration and Set duration tools, really handy when it comes to this kind of operation. Now that both of them has the same length, I position the clip on top of my freeze frame. Then, in my freeze frame stack, I place a Vector paint effect:
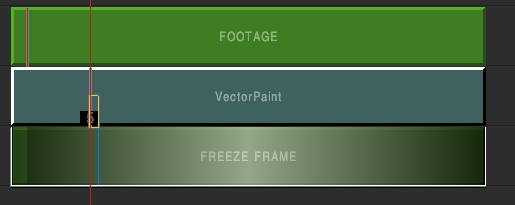
Now, let's go inside the vector paint (click on "Paint"). Now, I erase the logo with the clone tool, it works really similar to the same one in photoshop. Then I click on: Current Frame > All shapes. Whit that operation, the cloning is reproduced in All frames:

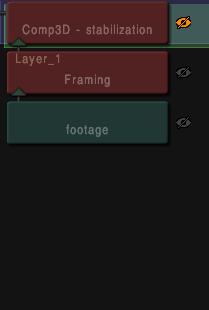
Now it's time to do the tracking and compositing. To do so, I add a Comp3D that embraces the clips:
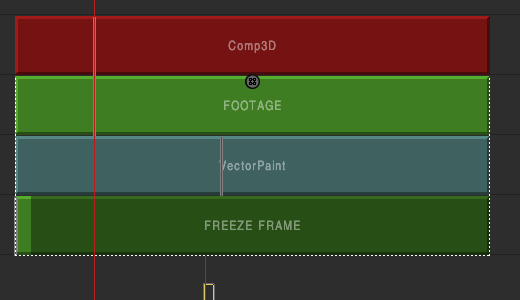
Inside the Comp3D, create a new layer. Layer 1 will be the footage, and layer 2 the freeze frame. Then, I click on the footage clip inside the Eval tree and create a shape that surrounds the logo. Then, in the Tracking tab, I activate shape mode and do the tracking backward and forward.
Next step, we go inside the Comp3D, select the layer 2, and inside the tracking window, click on Appy Move:

Finally, we have to get rid of the tracking and shape of the layer 1. Now, we create a shape of the area in the layer 2:
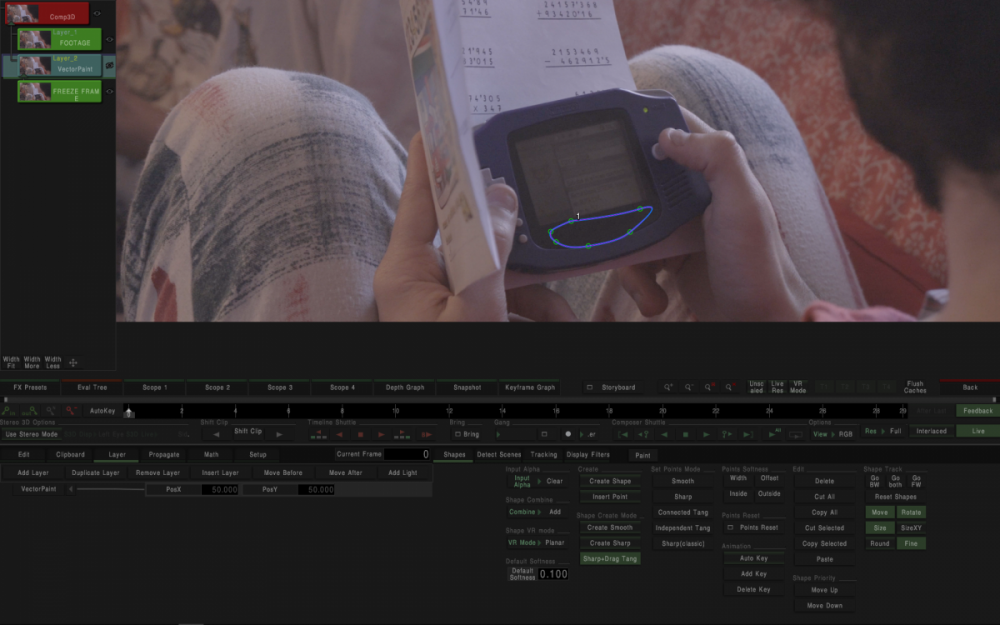
Finally, if you click con Comp3D, you will be able to see the mask area on top of your footage. Maybe you need to reposition the layer 2. It's worth taking your time to improve the composition with softness, a better shape, rotoscoping if necessary..etc.
To sum up, these are the steps:
1. Create a freeze frame of your footage.
2. Use the vector paint to clean the area you want to get rid of.
3. Use a Comp3D and embrace the two clips.
4. Track the area with a shape in layer 1.
5. Apply the tracking on layer 2.
6. Delete the shape on layer 1.
7. Create a new shape in the freeze image, layer 2.
8. Final adjustments of position, the softness of the shape...
Hope it helped!
Cheers,
Cristóbal-
3
-
-
Hi!
I think that may be a problem of the evaluation range. Every effect in Mistika has an evaluation range which decides what clips are being affected. If your evaluation range is not pulled down, then if you double click on it you won't find anything inside the visual editor, because anything is being affected. Just select it (it's a white rectangular box) and pull it down:

Hope it helped!
Cheers,
Cristóbal -
Hi!
Sorry for the delay Jan. We've been investigating how to sort out a solution for your requests. Thanks for sharing your thoughts and bits of advice about translating from Resolve. Awesome composition for beauty grading.
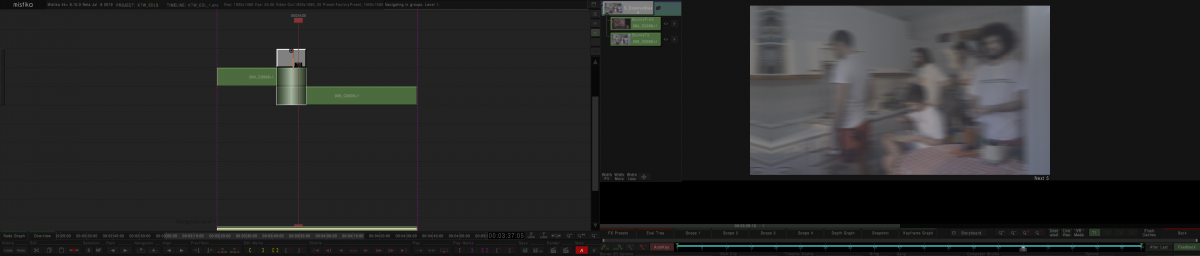
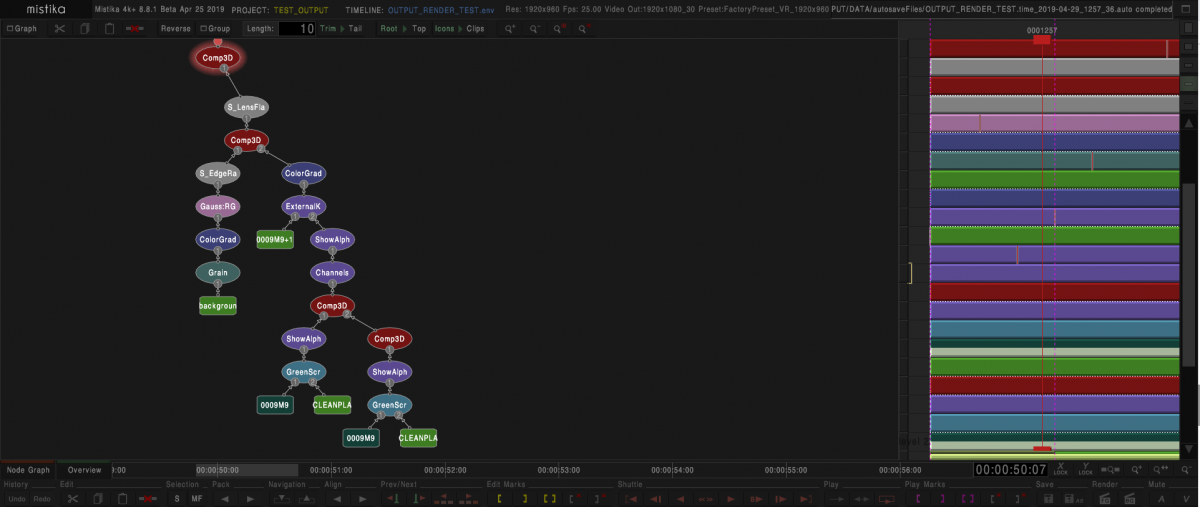
First of all, bear in mind that if you are more used to dealing with nodes you can select the Node Graph window right in the left part of the timeline editor. You can choose what way to work with. Sometimes I use both and I take the best of both worlds. This is an example of a node tree of a green screen composition I made:

Now, regarding your questions, let's break it down bit by bit:
Q1: There's an effect called Feedback in Mistika that kinds of do the feature you are asking for. However, we do not fully understand what you aim to do. It could be done as a dummy as you said, or by an FX preset. Please, would you describe in detail what you want to do and we'll give you a response as soon as possible? ?
Q2: Indeed, in order to plus alphas, the area is limited to the shapes you are creating. In order to make a key mix with different operations, you could use a Comp3D node or the Channels effect, which I personally recommend, hence I'll proceed to explain.I've made an explanatory environment for you. Let's supposed I want to plus an alpha of the teeth and an alpha of eyes in the same vector of the following picture. These are the steps to follow:
1. Create key of the eyes on a color grade. Create a mask in order to avoid extra information. In the Output tab of the keyer menu, select enable ext key, source, A, and finally Export Key > Inside.
2. On a separate Color grade, create key of the teeth. Create a mask as well. Do the same, in the Output tab of the keyer menu, select enable exte key, source, A, and finally Export Key > Inside.
3. Group them, and set a Channels Effect on top. In the Alpha tab, select Plus as operation. 4. Finally, group it, and you can use that as an alpha for your color grading. In another Color Grade node, you can set the footage on top and the alpha on the bottom. Then in the Output tab of the keyer menu select Enable Ext Key, In2, A.In the environment I've attached you'll see I have lightning the teeth and the eyes together. Of course, there are other ways to perform this same operation. I'd suggest the Channels effect four sure, but let me know if you want more examples.
Q3: I'm afraid you cannot drag and drop. You can copy and paste nodes, go to Layer > Insert Layer / Move Before / Move after, and rename them for more visual feedback ?
Q4: Feature request compiled! Soon we will post a survey for you operators to vote which one should be prioritized.
Q5: I love it too. So useful. Sometimes you can combine it with the Recover Mode in the Option Tab, which you can also choose what source to recover.
Hope it helped!
Cheers,Cristóbal
-
On 4/27/2019 at 4:58 AM, Rakesh Malik said:
Then it sounds like it's time to learn how to create display filters ?
I've been busy with some editing lately, so I haven't been working in Mistika as much as I was hoping. Argh...
Display filters are really simple to set up and easy to use! Check this tutorial that explains how to set a LUT3D as display filter:
Cheers,
Cristóbal
-
On 4/26/2019 at 7:41 AM, Aurora Films said:
Is the trial version also updated to 8.8.1?
Any way of getting license extension for the Open Beta?
Indeed. If you download the eval version now, it will be updated to be 8.8.1. Just go to your SGO shop account and download the last version. You don't need to create another account ?
-
Hi Jan!
Thanks a lot for the feedback. Indeed, we've been improving the use of the Tangents panel controls. We've improved the experience for the user to manually map the control as he wishes in collaboration with the tangent mapper software. Resolve, as far we know, does not let you change the mapping. Besides, we are currently mapping the latest Wave2 panel control for new users who have already purchased it.
However, the default mapping is gonna stay. But we can use this thread to talk about possible alternate mappings and maybe upload the files if other users prefer your way. It would be awesome if you share your mapping with us ? You need to open the Tangent Mapper. Then select File > Manage Control Maps. Then select your mapping and click on "Export". It will export an xml file that other users can import to their own tangent mappers software.
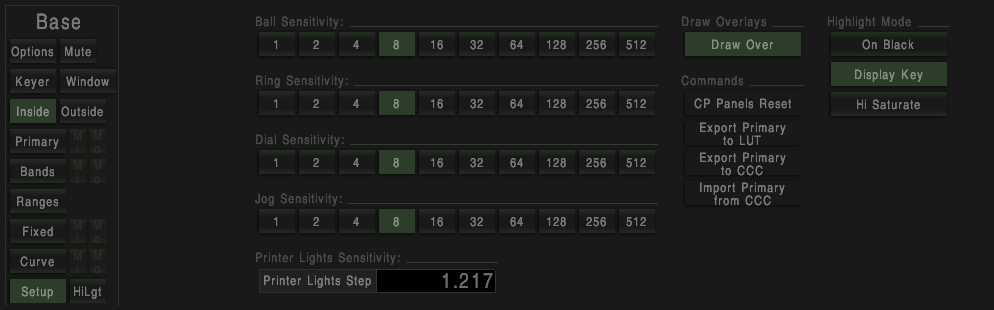
On a different topic, I'd also like to add that you can change the sensitivity of the different tools of the panels. If you go to the Set Up menu you can set different sensitivities for the tools of your panel. You can choose between the ball, ring, dial and jog sensitivity. The smaller number you choose, the more precision of the tool. The bigger the number, the faster it will dial.
-
1
-
-
Hi Abel!
Once the mapping is finished and tested, we will upload it here for you to download it, then you will simply need to import the file inside your Control maps in the Tangent mapper software.
Then, it will be built inside the forthcoming Mistika Boutique releases.
Cheers,
Cristóbal
-
1
-


Save Grad as 3D LUT
in Releases
Posted
Hi Jan!
Currently, exporting a 3D lut capable of being imported in other softwares is not possible. However, it is listed in our feature request document for Mistika Boutique. Sorry for the inconveniences.
Best regards,
Cristóbal